
Check out our latest custom, a quick fix Triumph Thruxton scrambler. With a few Purpose Built Moto touches we upgraded it to a super-modern street ready beast.
When Bryce bought his 2016 Triumph Thruxton R into the garage, even though he loved riding the bike, he was a bit bored of the standard set up and wanted a few upgrades to turn it into a street ready scrambler. His main points for the upgrade were to refresh the look, streamlined the overall silhouette and bulk up a few features.
These conversions are always met with a little bit of criticism, “why would you ruin the street capability of the bike” the keyboard warriors sing and the answer is always the same. It’s our job to deliver a motorcycle the customer gets excited about, that they love and think about even when they’re not riding. If our customer wants knobby tyres on a 1200cc twin with Ohilns street bike suspension, that’s what he’s going to get.
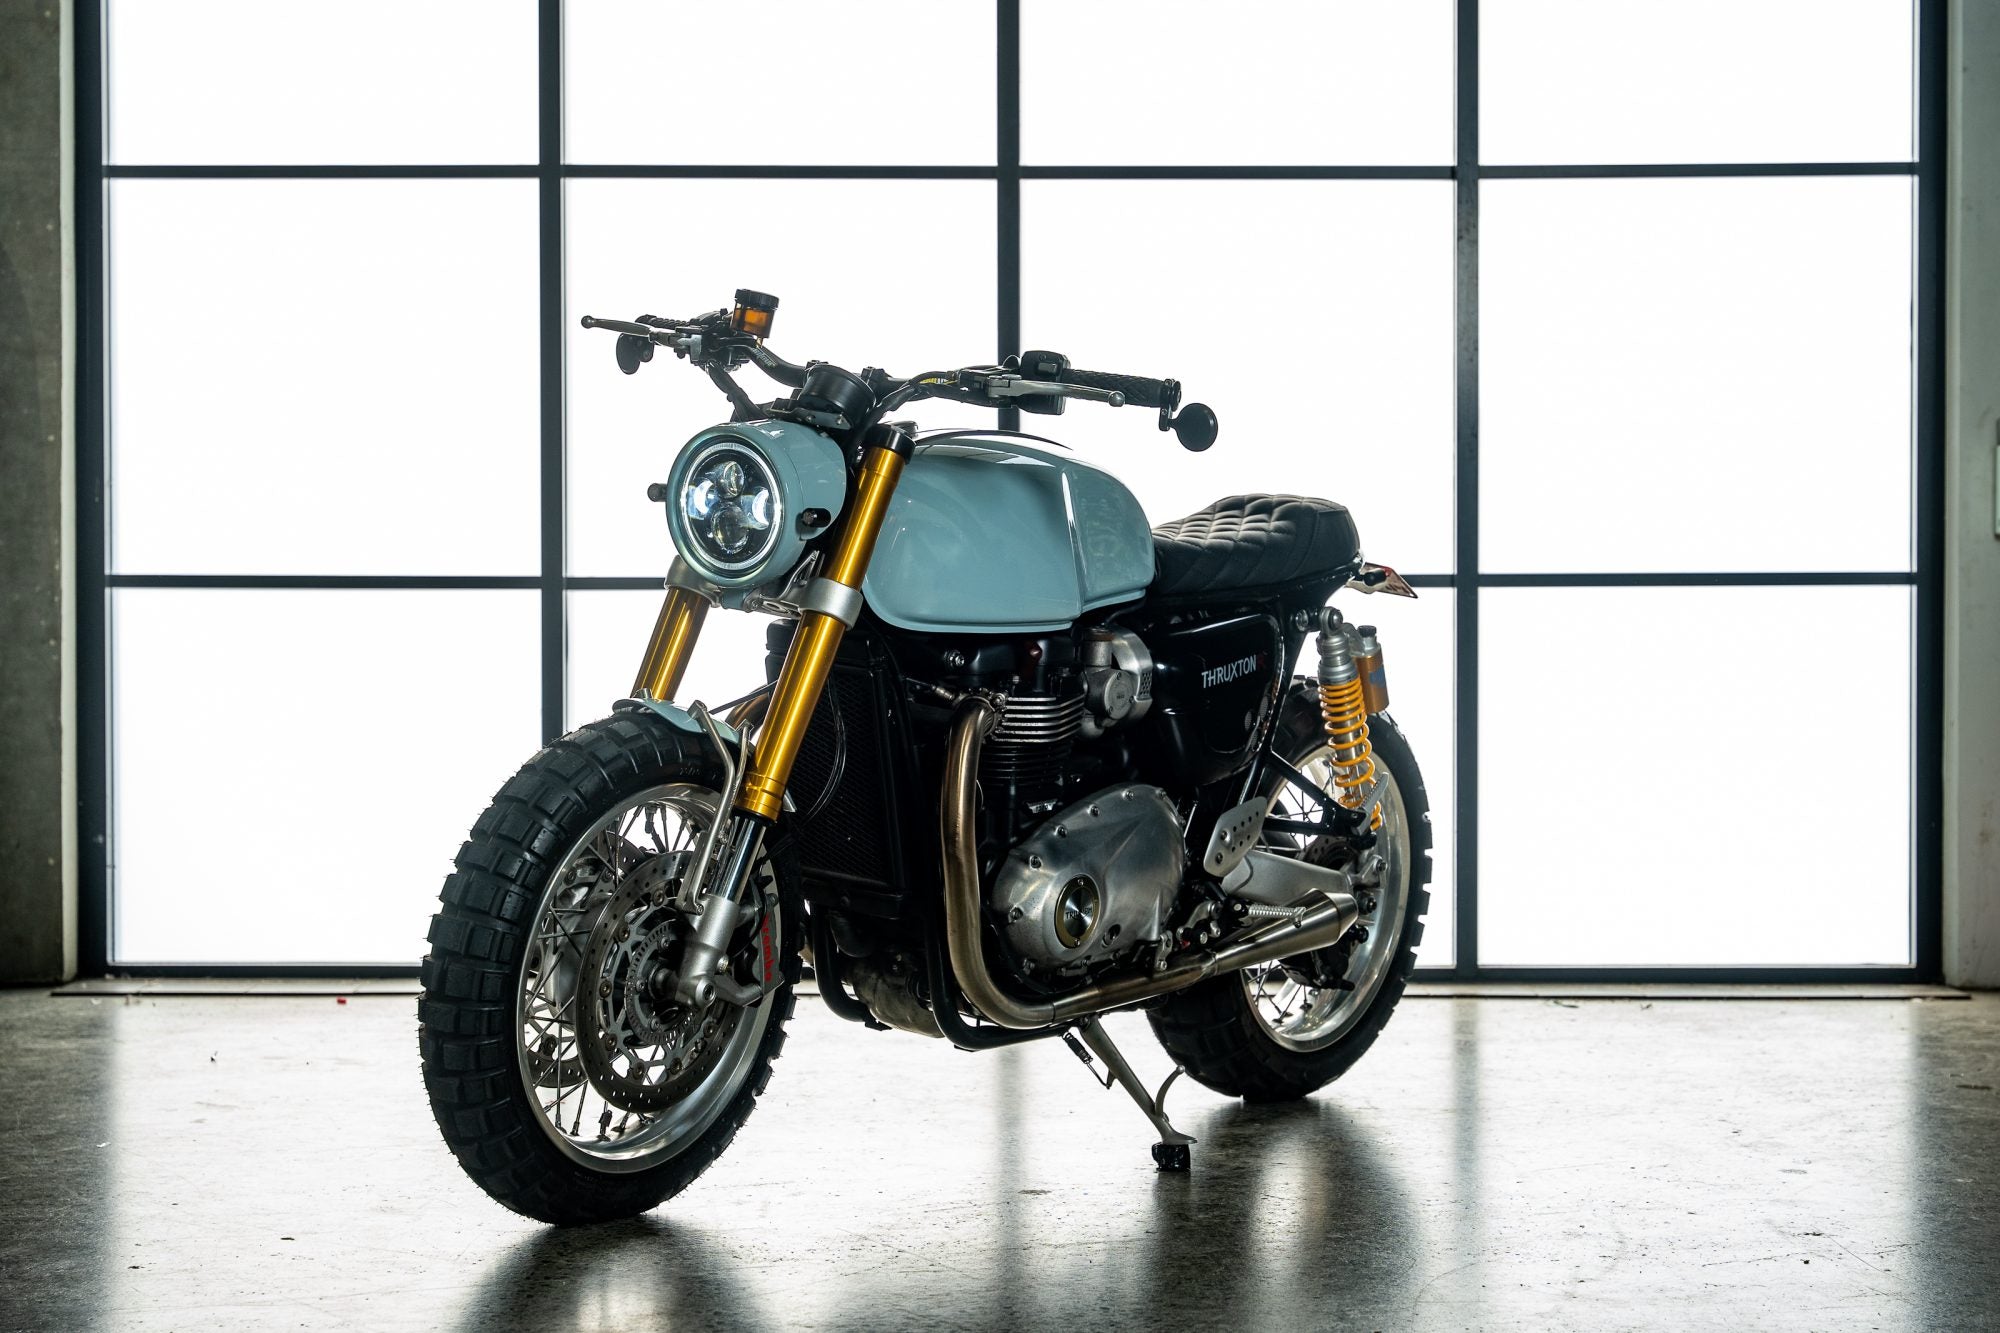
The Triumph Thruxton R comes with all the fruit, standard Ohlins suspension front and rear Brembo brakes and some nice light spoke alloy rims. So ultimately, the upgrades weren’t anything too major. We went for quality over quantity with this triumph. The biggest changes we made were mostly to the front end. Starting with the tires, if you’ve seen the scramblers coming out of the PBM garage recently you may have noticed that they all roll out with these big knobby tires. Riders love them because they feel good on the road and they look tough. This Triumph Thruxton Scrambler is running a Continental TKC80, personally, I love the chunky look of these tires and they give the bike the off-road capability that you want in a scrambler.
Keeping with the theme of a tough aesthetic, we used some thick 8 and 10mm stainless steel bar with the front fender mount. Using the PBM fender fabrication kit with mounted threads and thick bar work really added to the big beefy scrambler front end look we were going for.

We ditched the standard Triumph headlight and replaced it with our 7” Classic Flashpoint LED. We used the bottom of the triple clamp to mount the headlight which freed up the factory mounts to wire up some black dome LED indicators. We used some aluminium to shape a headlight cowling which sits over the top of the headlight and used the indicators as the fixing bolts. To finish up, we had to offset the headlight a little bit to clear the factory key and set the gauge to sit slightly to the left, keeping the handlebar area nice and tidy.
The last few pieces we upgraded on the front end were the triple clamp and handlebars. We used an LSL triple clamp and bar clamp with a set of Pro Taper Charmichael Bend Contour handlebars. We kept the standard switchgear for the Thruxton Scrambler and we used some Biltwell grips with some tiny bar-end mirrors that Bryce had fitted before he came in. The final piece we tricked out on the handlebars was the Daytona W gauge. I’ve started using these Daytona W gauges more and more on our builds – it’s a single 90mm gauge that contains your speedometer, tachometer, odometer and dash lights all in the one casing. Simple, practical, perfect.

If you watch the video we made for this bike you will hear the beastie sound the Triumph Thruxton Scrambler makes. We retained the factory headers because there wasn’t much that needed to be done with those. All we needed to do was take the headers off and give them a hard polish, they were a bit grubby, Brice obviously loves riding this thing. We replaced the cat with the Motone X-pipe that sits underneath the engine and runs into a set of two PBM torpedo Mufflers which sit on both sides of the bike.
Moving down to the tail of the Triumph Thruxton Scrambler, we had to do a bit of work here to give Brice the practicality and style he was looking for. We shortened it and fit up a tail hoop which called for a new set of rear lights. Matching up with the front indicators we used our Dome 3-in-1 LEDs which give you your brake light, running light and indicators all in one. We finished it off with a tail tidy kit with a plate light to keep it neat.
Our rider mentioned that he likes to double, so we fabricated a custom seat pan and had that trimmed out by Timeless Auto Trim, leaving enough room to fit two people. There wasn’t a whole heap of space to work with for doubling, but with the amount of foam we put in the doubling position, it should be pretty comfortable for longer rides.
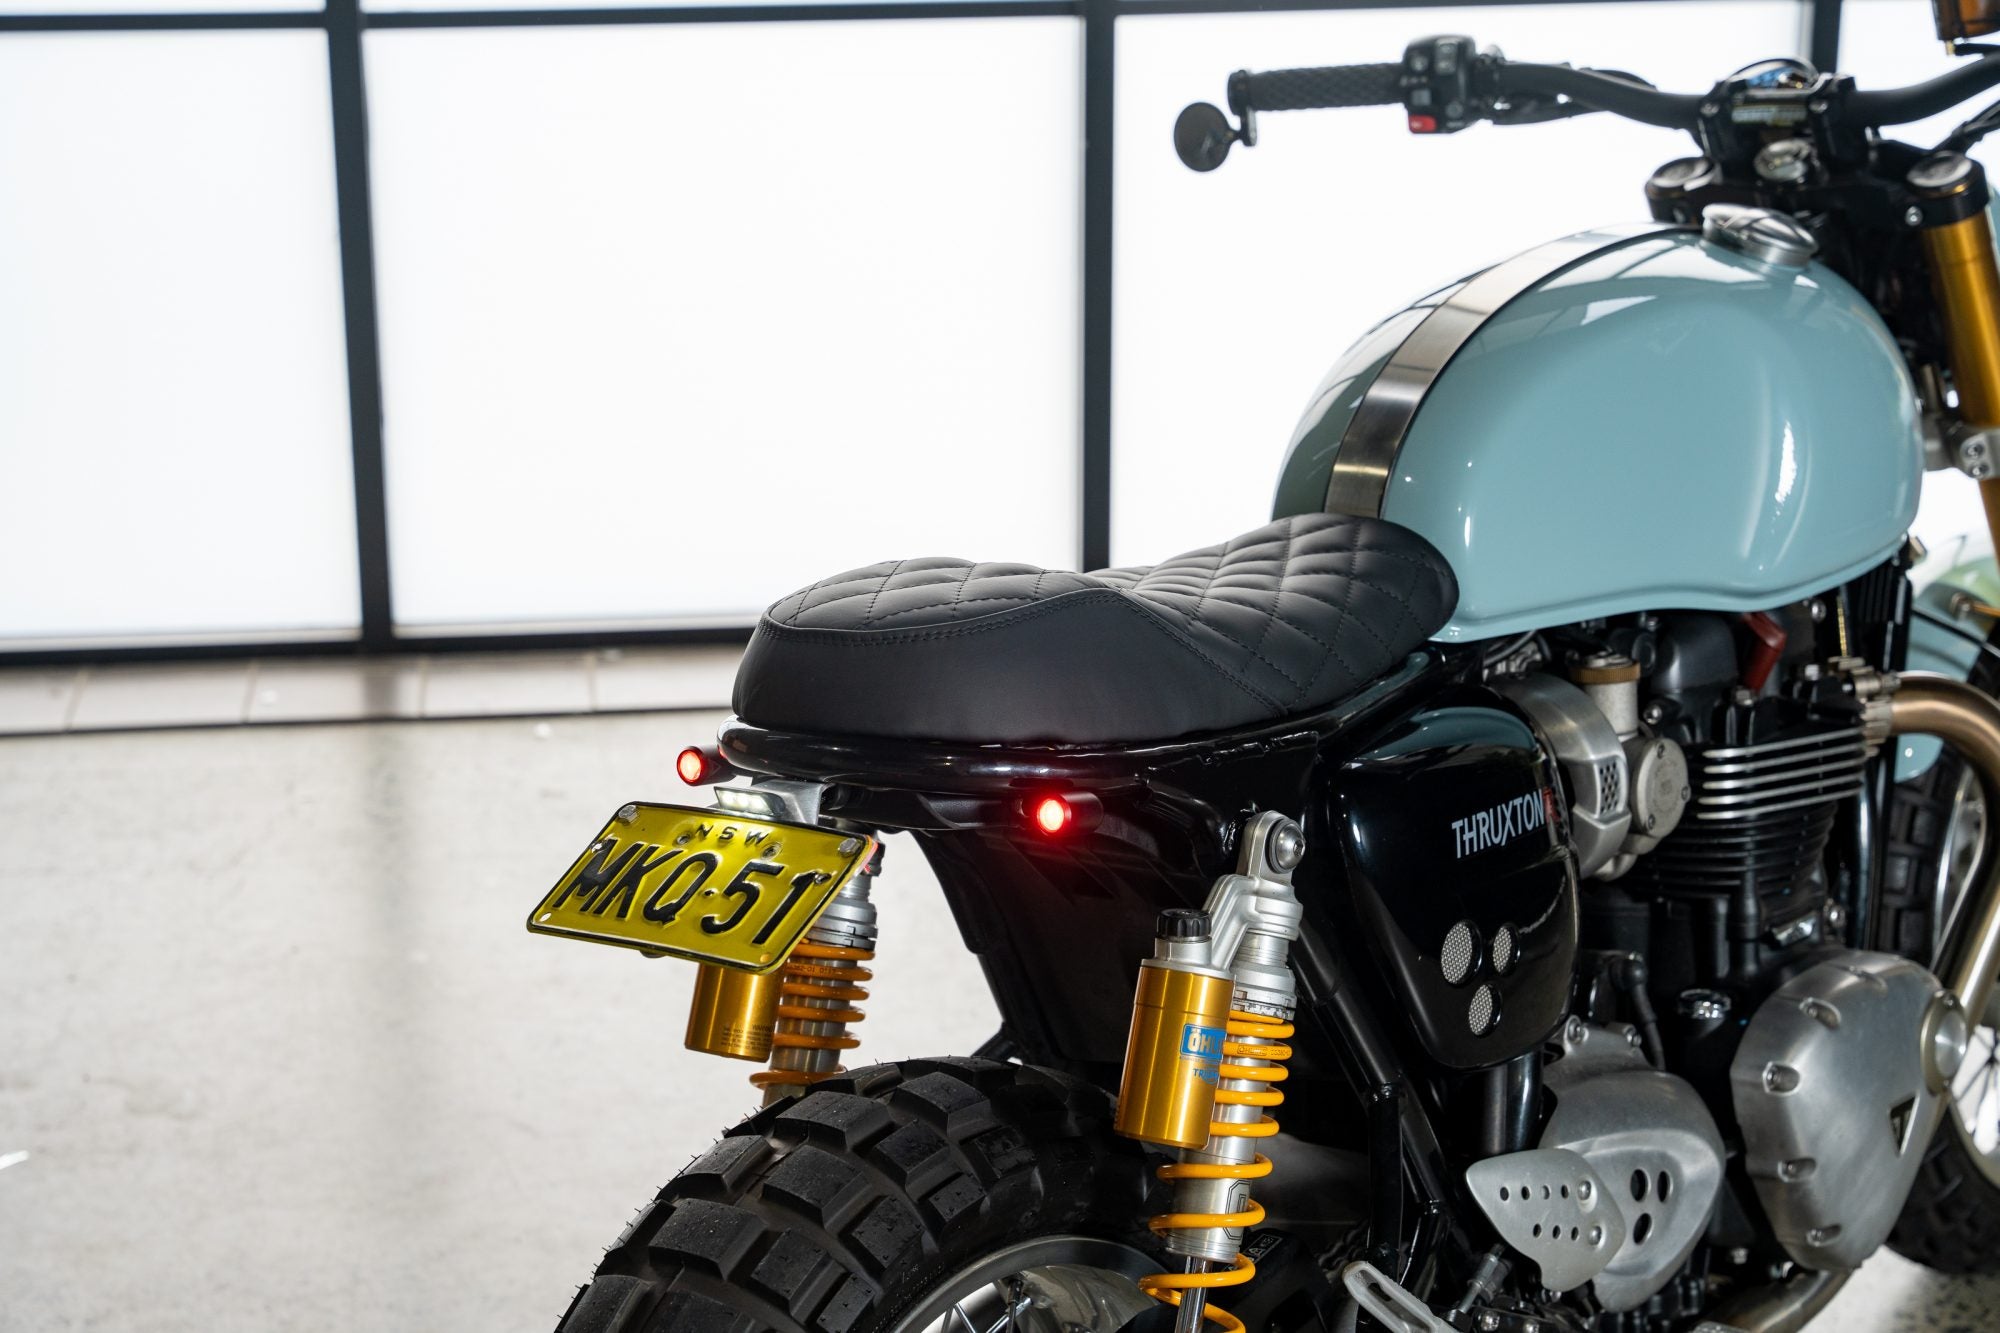
The finishing touch was of course the paint job. I worked together with Nathan from Livin’ Loco on this one. I went around to his Burleigh workshop and starting with a bright sky blue, we dulled it out with more and more grey until we landed on this really nice chalky blue colour. It’s not something that you’d expect on a mean looking scrambler, but with the brushed metal finishes on the rest of the bike, the gold forks and the black seat, it worked really well.
Getting to test ride the Triumph Thruxton Scrambler after we’d finished all the upgrades was pretty fun, it’s super responsive, a dream on the roads and the tough build with a softer paint job really turns heads. It was a bit of a big swing, but Brice was stoked with the end result. That means our job is done, onto the next!


WE BUILD BIKES WITH PURPOSE.
Purpose Built Moto is home for unique custom motorcycle builds. We offer a unique motorcycle customizing experience in the heart of the Gold Coast.


