


Fabricating a recessed LED strip brake light into the frame
This is one I stumbled upon the answer to only recently. When I first started building bikes, I used a few of these LED strip brake lights, just affixed to the tail hoop not recessed in. I then started to get creative with my brake lights, mounting inside the seat, or in the tail cowl etc.
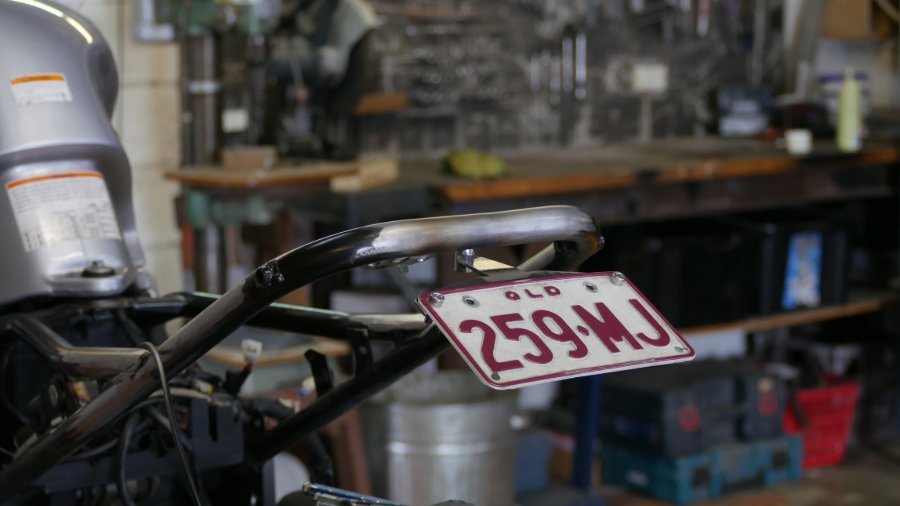
Then I had a Ducati GT1000 come into the shop, it needed a recessed LED strip light to clean up the tail. So I put my head to it, figured out the best way to go about it and below I’ll share that with you.
You can buy a pre-made tail hoop with the recessed slot, however this won’t work for every frame size. The Method I use below is completely universal. All you need is a few tools, patience and minor fabrication skills.
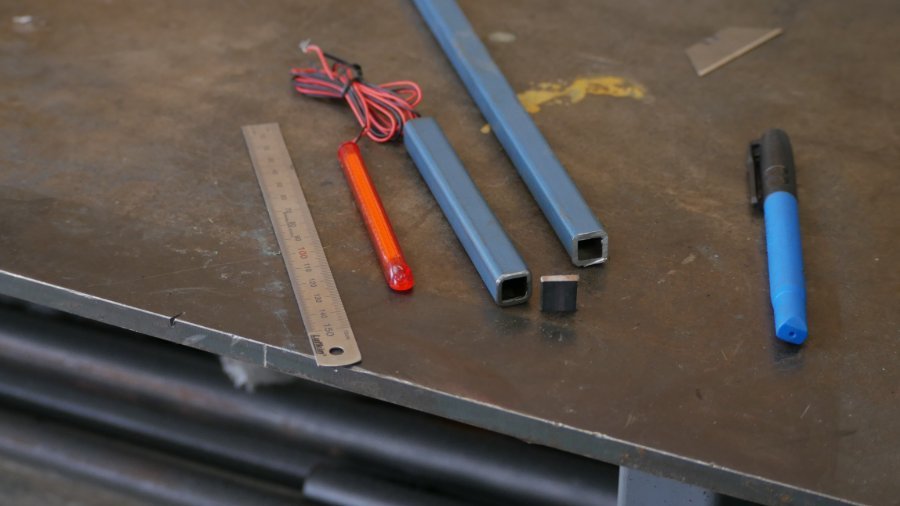
Materials needed:
- Motorcycle
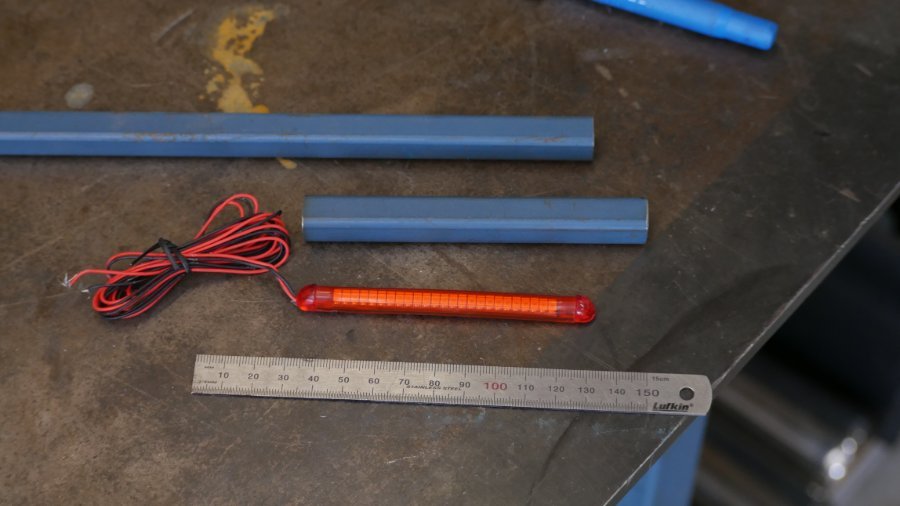
- LED strip light + brake/tail splitter
- 13mm square section steel tube x 300mm long
- Welder (I use a 185 AC/DC TIG)
- 4” Grinder, cut off wheel, finishing wheel
- Drill, 11mm, 8mm, 5mm drill bit
- Small hand files
- Vice
- Die grinder (optional)
- Air saw (optional)
- Blow torch (optional)
I’ve used this method a few times now on various bikes and frame types, with different length recessed LED strip lights. I’ll assume your frame already has a frame hoop attached, If you need to do that still, read my blog on Fitting a frame hoop first. Although you need to weld, it is painfully simple to do. The most important thing is having an eye to get it center and straight in the frame. So let’s jump in.
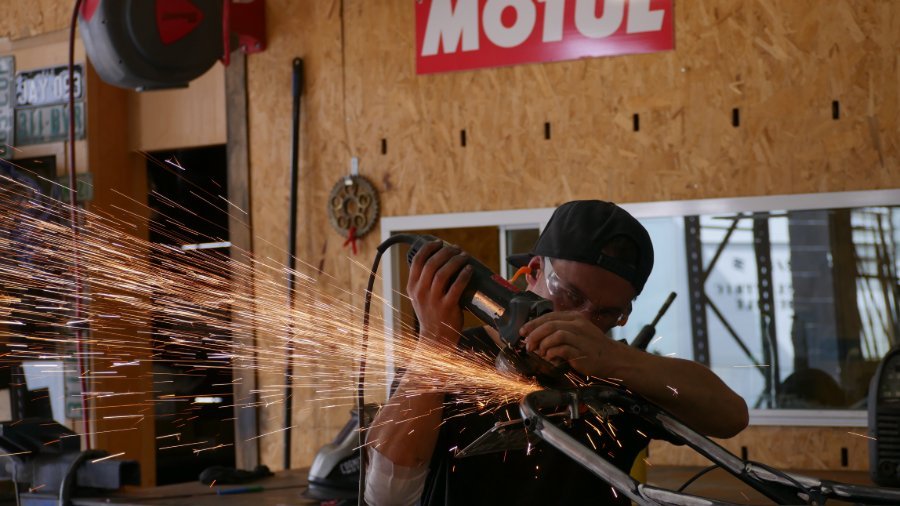
1. Strip the tail.
Artists work on a blank canvas, so fuck it, so will you. Remove the seat, any fenders and old lighting. Now strip the paint off the section you’ll be working and welding on. A critical part of good welding is the preparation. Get the steel nice and clean. Free from paint and rust, this gives you a good base to start from.
2. Bending + building the light housing
This frame is straight, but most of the time we need to put a bend in the 13mm x 13mm square section you have to suit the frame. You can either make a cardboard template of the bend in the frame loop, or just check the steel directly on the frame. Up to you. Normally the bend is so slight, you wont need bending dies or mechanical benders. That’s where the extra length on the 13mm square section helps, for leverage.
Just set the square section in the vice, if you have a blow torch apply some heat to the outside radius of the bend and apply some weight to it. Bend a little at a time and keep checking until the radius is right. If you don’t have a blow torch to apply heat, you’ll need to bend a small section, re-position in the vice and bend again. Repeating the process until you have the right radius to suit your frame.
Once the steel is bent, measure the length you want for your recessed LED light (80-160mm is my sweet spot depending on the bike) Add 15mm to each end and cut it away. Once you have your section cut out, you will need to cap the ends. Cut 3 sides of the 15mm section away and fold the remaining side to close in the ends. Now weld it up so you have a box, and finish the welds back so you’ve got clean edges. For this blog our box is 120mm long.
3. Preparing + cutting your frame.
Now before you jump off this page because you think cutting a frame is dangerous, let’s think this through…. Yes you are cutting a section of the frame. Are you making it weaker? No. I’m going to guess the wall thickness on your frame tube is 1.6-2mm. The one face you are removing from the tube, is being replaced by 3 x 2mm faces. If anything this should strengthen that section. If you’re worried about doing it, ask a professional for help.
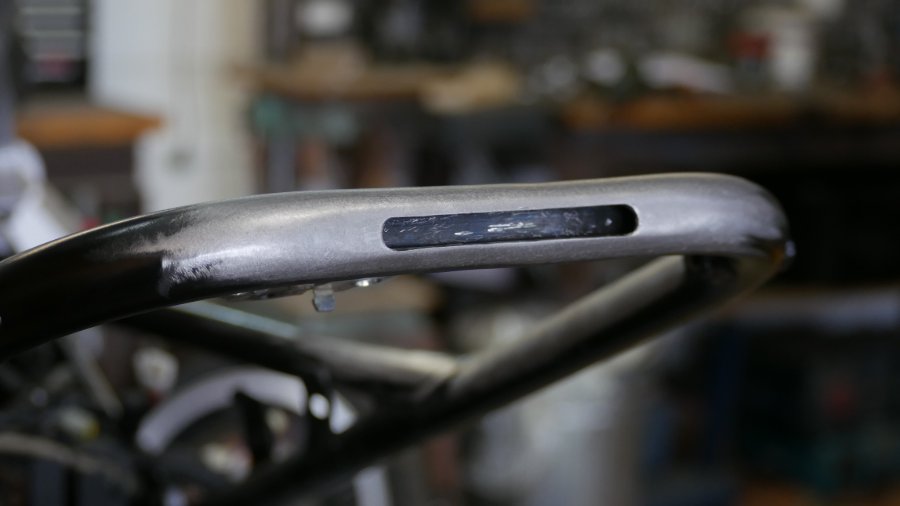
On your stripped and cleaned frame loop, mark a center line. From the center line measure out 75mm each side and mark the 150mm x 13mm cut out for your light enclosure. Double check you’ve got it centre and straight before making any cuts.
If you’re happy, get cutting!! I’ll drill a 11mm hole on each end inside the cut out line, then cut between the 2 holes with a thin cut off wheel. The square corners can be finished by hand filing or a die grinder. Check your LED strip light enclosure fits and make any adjustments needed so it’s a snug fit. With compressed air of a vacuum, remove and swarf or metal dust from inside the frame. Ready for welding now!!
4. Welding in the LED strip light enclosure
Welding the LED light enclosure is a pretty straight forward job, clean and prep your pieces and remove any wax/grease with acetone before you get going. I will sit the 13mm square section 1-2mm out from the join on the tube. Because you’re welding a square surface into a round tube, if you sit it flush you end up with a visible flat spot on the frame.
Once you’ve welded the seams of your recessed light enclosure, finish the welds back with one pass and we can now make the cut out. Final finishing can be done later.
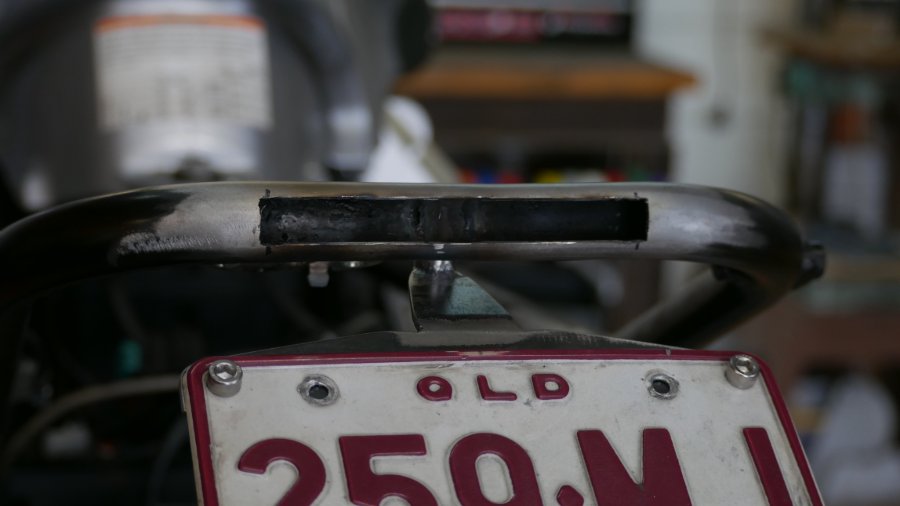
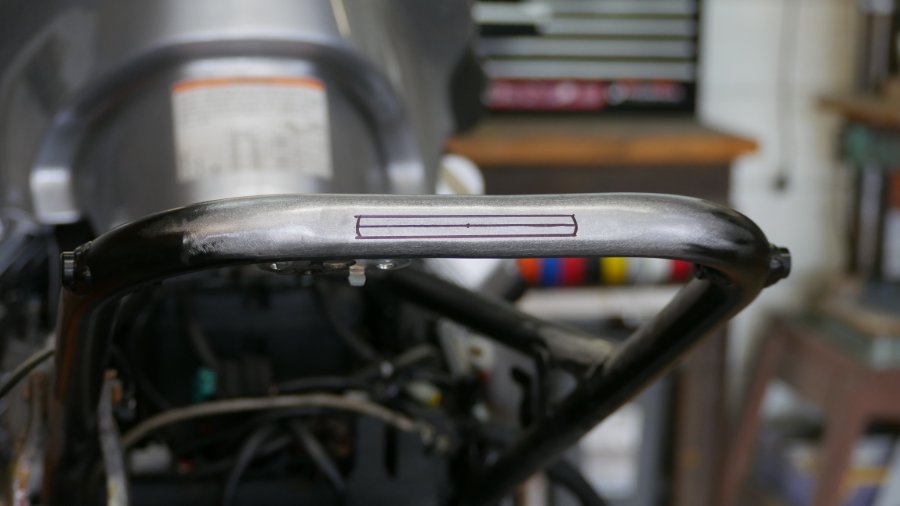
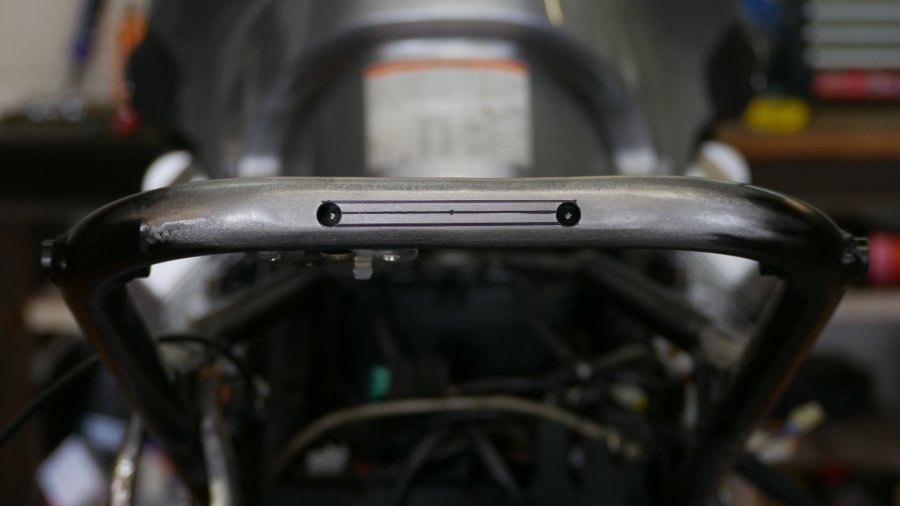
5. Marking + Cutting the recessed light hole
Your LED strip light may be 150mm long, but the usable LED section is usually about 130mm. To avoid dead space, I will only make the cut out hole 130mm. Mark a new centre line on your frame. Measure out 65mm on each side and mark a 130mm x 8mm section on the frame. Again, here I will drill 2 x 8mm holes on each end, this time leaving a rounded end on the cut out. Cut between the 2 holes with a thin cut off wheel. Finish your cut edges smooth with a hand file or die grinder. You can also now finish the weld seams properly and smooth the outside area of the tube.
Having the cut out a little shorter than the recessed LED light serves 2 purposes. Firstly it wont show the un-illuminated sections of the light body, giving you a better finish. Second, when you pop the flexible LED strip light in, it retains it better having the steel overlap the light body. The only fabrication you have left is to punch a hole for your wiring. Drilling out the hole with a 5mm drill bit through the back of the light enclosure and through the wall of the frame tube.
Once this step is sorted your job is all but done. Get your frame painted or powder coated and read the final step below.
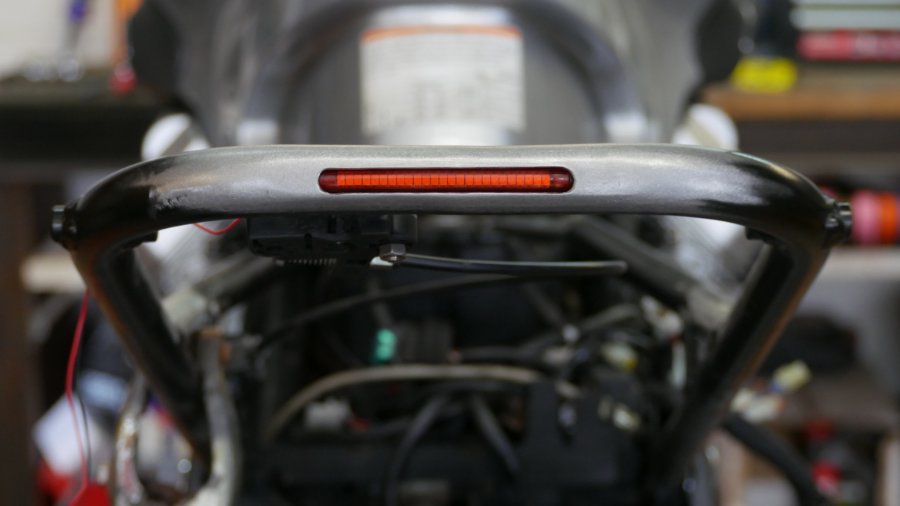
6. Fitting the flexible LED strip.
With your freshly painted frame, we now want to install the light. The flexible LED strip should come with double sided tape fixed to the back, you may want to attach another layer on top of whats supplied to bring the LED forward a little. The 13mm section used is 2mm too deep for the LED strip. It’s a small detail, but details count. Making sure the LED is center slide one end inside the tube. Run your wiring through the frame, flex the led strip and press the other end in. Pushing it down flat to fix it down and get it straight.
Last detail is to seal the frame hole from the back to prevent water getting in. The LED is waterproof, but if water gets in it could cause rust to spread internally. A bit of sealant in the cable hole will be all you need.
Recessing flexible LED brake lights is a pro move, and always the first question anyone asks when they see the bike on the road. There is more than one way to make it happen but there’s mine. You’ve been given the keys to the kingdom, now don’t fuck it up!
I really hope that step by step guide will help you build a better quality bike, at the end of the day that’s what we’re here for. Getting better bikes on the street! Leave me a comment below for any questions you might have, or to tell me I’m an idiot and this is all wrong.
WE BUILD BIKES WITH PURPOSE.
Purpose Built Moto is home for unique custom motorcycle builds. We offer a unique motorcycle customizing experience in the heart of the Gold Coast.


7 comments
Can you get these light strips with blinkers on each end
The square tube, properly encloses the light, using flat stock is easier, but that’s cutting a corner the delivers a poor quality result.
I love the write up, very nicely done. I am about to do something very similar to integrate brakelights/blinkers into the passanger pegs of my chopper build, my question is: is there a reason you used square stock to weld into the tubing rather than just a piece of flat stock?
Hey Jess,
No we dont, the square section is welded in complete and then cut out for the light to be fitted.
Its all explained within the blog for you.
Hey guys. When you cut the section of frame out to put the square section in. Do you end up welding the piece of frame back in over the top of the square section.
A pretty simple how to, with the right tools. have fun with it!
Been looking for this! Thanks Tom.