SIGN IN YOUR ACCOUNT TO HAVE ACCESS TO DIFFERENT FEATURES

FORGOT YOUR PASSWORD?

FORGOT YOUR DETAILS?

AAH, WAIT, I REMEMBER NOW!
  • Shop Headlights
  • Shop Indicators
  • Shop Fabrication
  • Shop Moto Kits
  • Shop Air Filters

Purpose Built MotoPurpose Built Moto

• Community Garage
• Custom Moto
• Custom Parts

Call: 0467 417 828
Email: tom@purposebuiltmoto.com

Purpose Built Moto
Gold Coast, Australia

Open in Google Maps
  • STORE

      Featured categories

      See all categories

      Headlights

      Indicators

      Tail lights

      Handlebar switches

      Fabrication

      Control relay

      Mufflers

      DIY Kit

      Mirrors

      Gauges

      Levers/Throttles

      Air filters

      Wholesale Parts

      Apparel


      Wholesale

      My account Request pricing
  • BLOG

      Blog sections

      See all blogposts

      Electrics

      Parts Installation

      Fabrication

      DIY Motorcycle Kits

      Seats

      Our Bike Builds

      Restorations

      Lifestyle

      Adventure Rides

  • SERVICES
    • Motorcycle Customisation
    • Exhaust Builds
    • Motorcycle Wiring
    • Custom Fabrication
    • Motorcycle Mechanic
  • GALLERY

      Gallery categories

      Cafe Racers

      Brat Style

      Scrambler / Tracker

      Bobber / Chopper

      Restorations

      Videos

      See all videos

      Bike Builds

      Parts Guides

      Events

      Other

  • CONTACT
    • Contact
    • FAQ
    • About
    • Testimonials
    • Media
    • Returns
  • MY CART
    No products in cart.

Home » Bike customization » Seats » How to build a Cafe Racer seat

Home » Bike customization » Seats » How to build a Cafe Racer seat

How to build a Cafe Racer seat

by Tom / Wednesday, 19 April 2017 / Published in Bike customization, Seats, Tech articles
DIY cafe racer seat scrambler seat

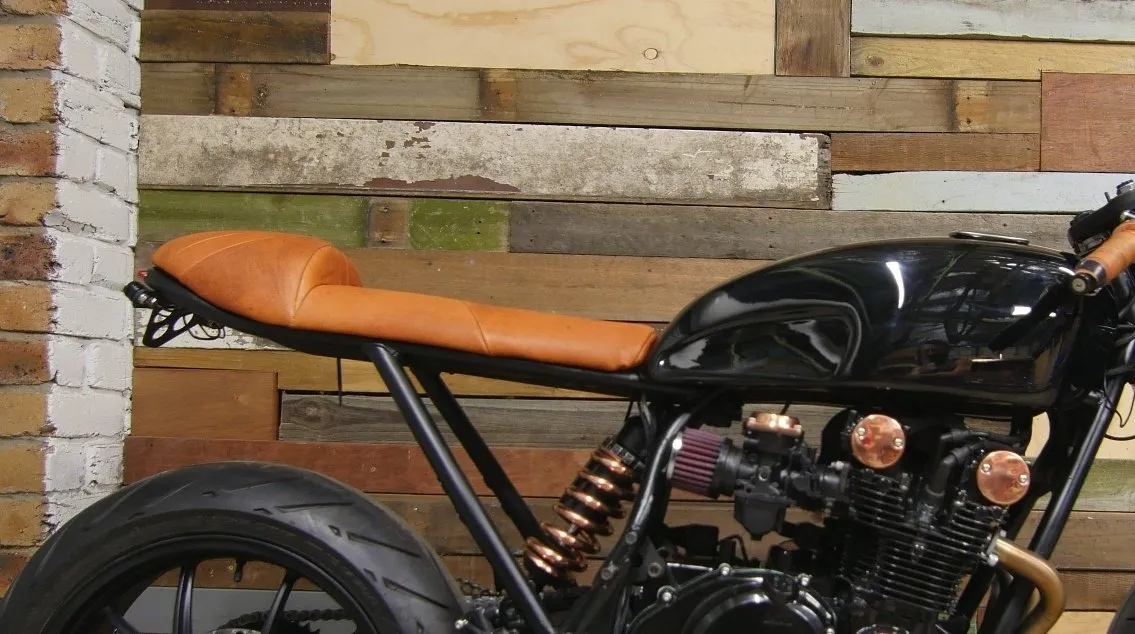
How to make the perfect Scrambler or Cafe Racer seat.

“Hey man I have a cafe racer seat off eBay that should fit my bike but I can’t get it right can you fit it for me?”

Hell. Fucking. No.

A lot of people fall into the trap of the online cafe racer seat, made specifically for your bike. In short, they usually aren’t made for your bike, they’re made for your bike with some modification to the frame and massaging of the mounting points. For the most part, they will end up costing you more with modification and yield poorer results. My advice would be to either have someone make one for you or sack up and do it yourself. It takes time but the finish is always exactly as you want it, and it will fit perfectly every time.

Get a free quote for a custom seat here

Here we will be running through:

  • The parts you will need
  • The mount
  • Laying the base
  • Covering the tail, tank and frame rails
  • Fibreglass preparation
  • Fibre glassing
  • Removing excess
  • Fitting the seat pan

How to make Cafe racer seat Tech articles parts motorcycle accessories

This example will show a bike with a custom tail cowl which you can learn to make by Clicking Here. This method will work with any style seat whether it be on a chopper, a floating bobber seat or a brat style seat. It’s all the same just make the adjustments needed for your bike. It’s a given some seat pans are quicker and easier to make from sheet metal but for this type, I have the seat wrap over the frame so fiberglass is my weapon of choice.

What you need to make your Cafe Racer seat:

  • Sheet metal to cover the seat area or similar bracing
  • Cardboard off cuts
  • Rasp file or blade
  • Masking tape
  • Micro scale (kitchen scale in a pinch)
  • Measuring cups
  • Paint brush (cheap and nasty is fine)
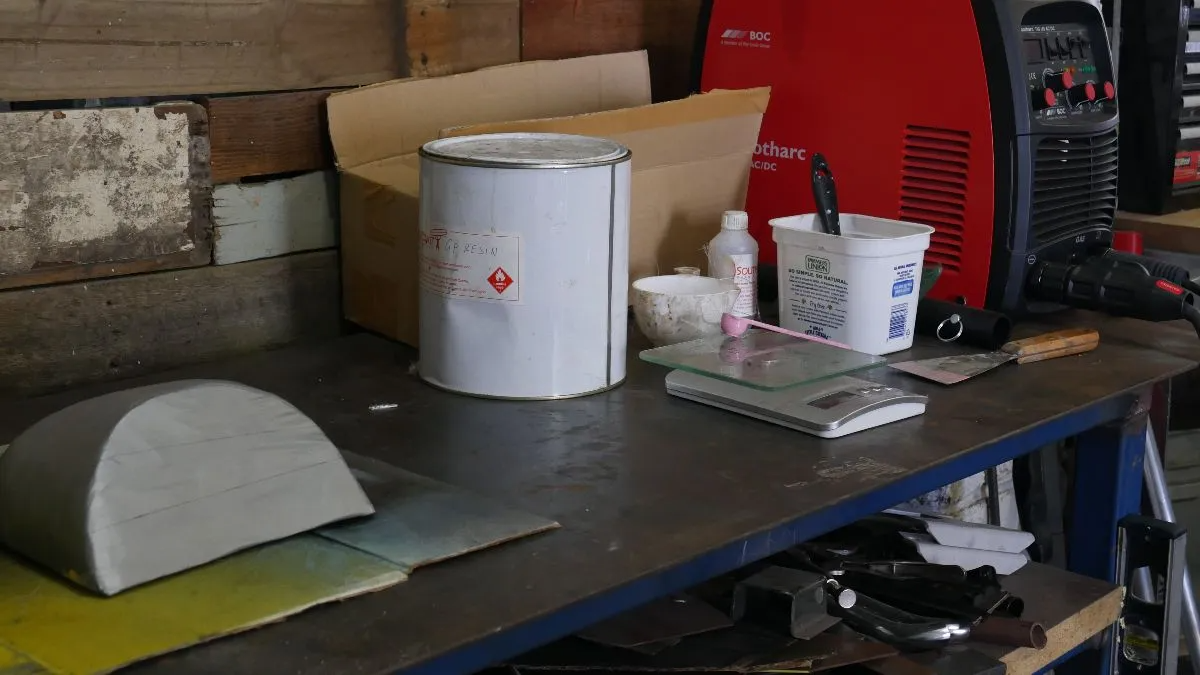
  • 1 kg fiberglass resin + Catalyst
  • 1m fiberglass matting (2m if you’re doing a tail cowl too)
  • Glasses or goggles
  • Dust mask
  • 3” cut off wheel or grinder
  • Linisher or Coarse sand paper.
  • Seat foam
  • Contact adhesive

I personally prefer to use chop strand matting, but woven will work as well, in my experience the woven is a bit more flexible once set and needs more layers. The chop strand mat tends to conform to the shapes better as well.

Fibreglass cafe racer tail hump parts DIY

1. Sort the mounting out

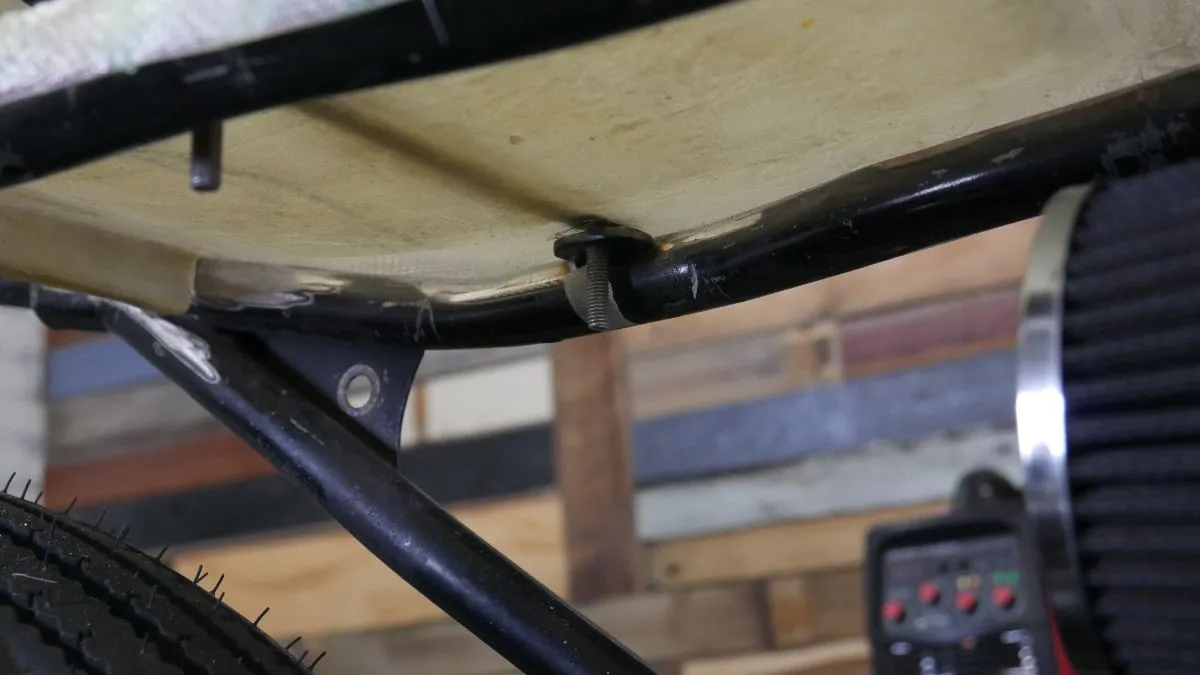
In preparation for the seat pan, you need some way to fix it. The best way for my mind is to weld 2x tabs on to the frame rails and 2x M6 bolts to a piece of 15mm flat bar to suit them. On a short seat, 2 is fine on something longer you may want a third tab + bolt at the rear. If you can’t weld try to utilize some existing fixings in the seat area and instead of welding the bolts into the bar drill the holes and use a lock nut and some thread glue. Put some bees wax or release agent on the thread and set the fixing bar aside for when you’re ready to fiberglass. Here you should also think about the electrics tray and where it will mount or be welded in.

Mounting Cafe racer scrambler seat How to motorcycle accessories

2. Lay your base down

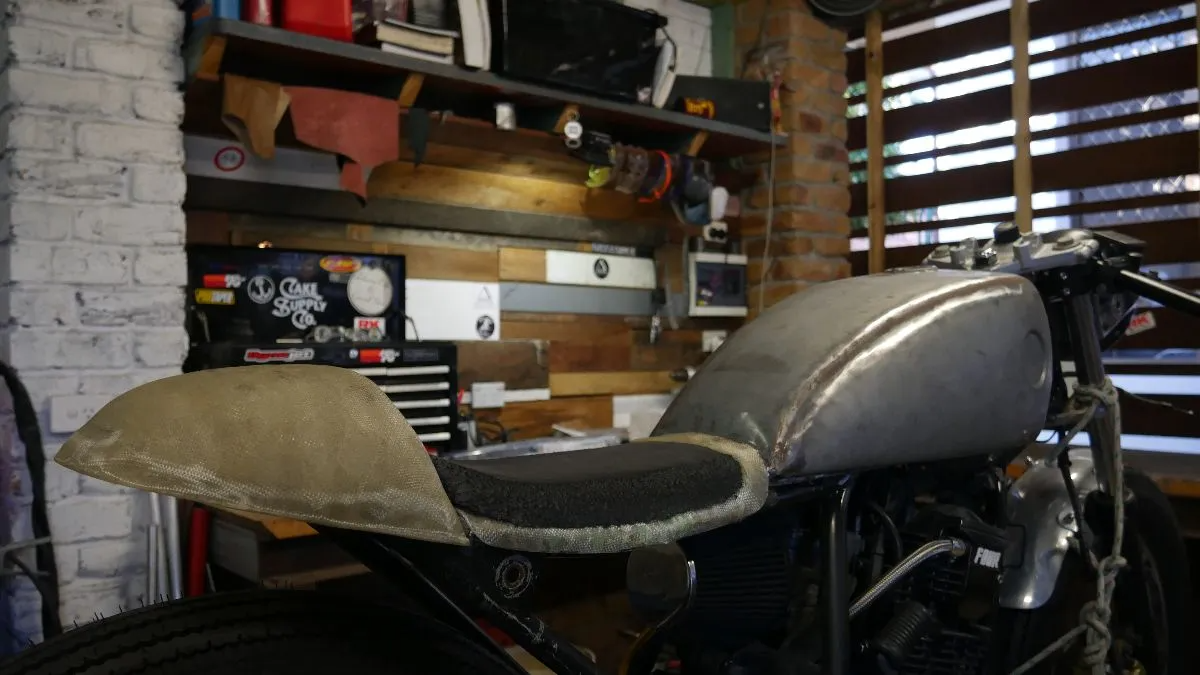
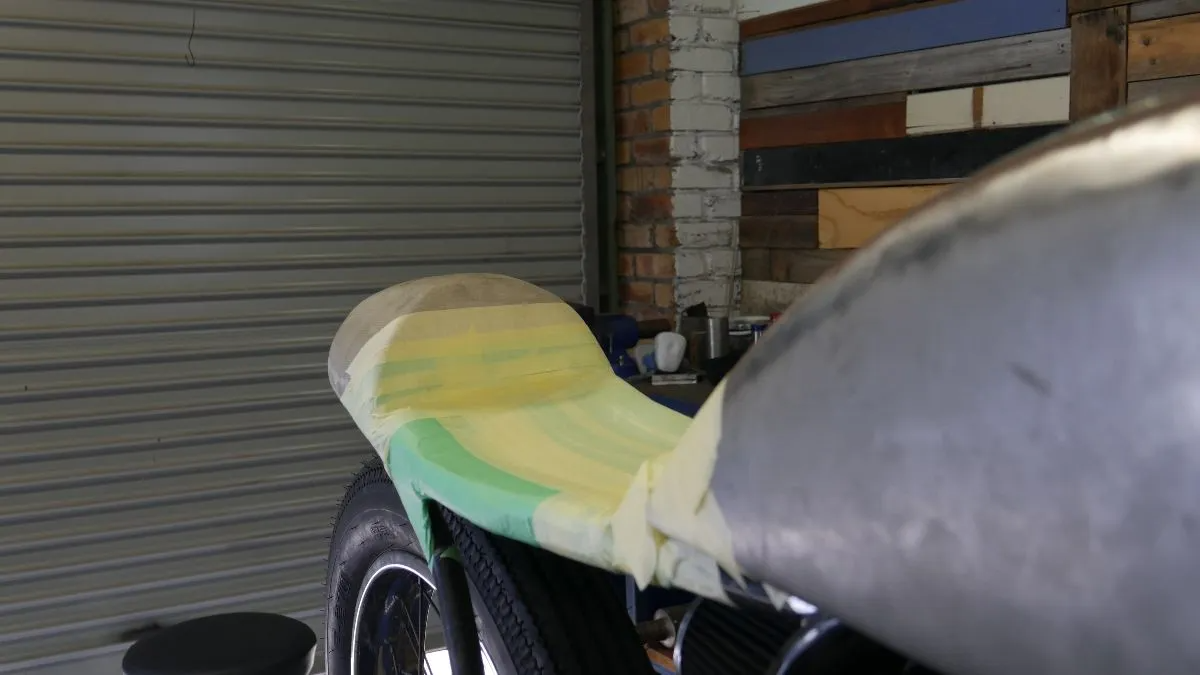
This can be as simple as some cardboard cut out to show the shape. If you’re making a pan to sit on top of the frame rails get your shape cut out and fiberglass it on a bench. For this seat, I want to hide the frame rails so I’ll do it on the bike. If doing it on the bike I lay down some sheet metal on the area and tape it in place.

Fibreglass your own motorcycle seat cafe racer scrambler tracker parts

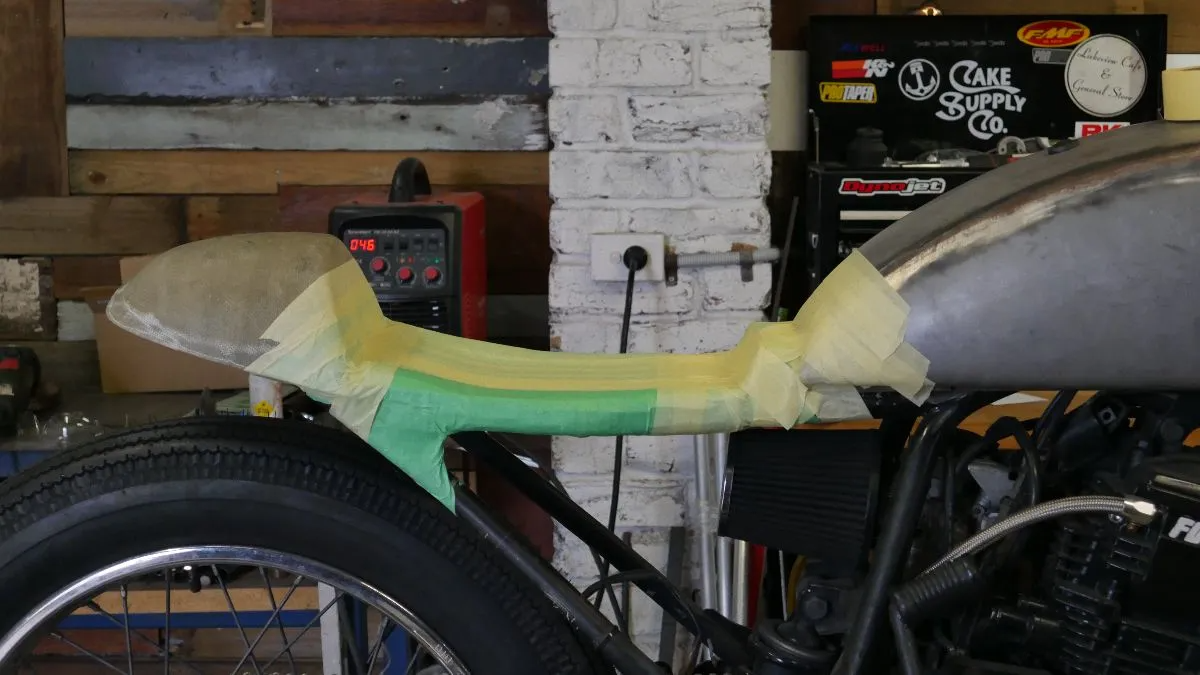
3. Cover the tail, tank and frame rails.

Make sure the area is thoroughly taped over. To cover the tank fixing section and frame rails while leaving enough room for the upholstery, I use some cardboard off-cuts taped along the frame rails and over the fuel tank bolt. This allows a small buffer for the upholstery and foam to be wrapped over and fixed without affecting the fit of the seat. When the tape is finished run over it with a thin layer of bees-wax or release agent. The final step is to mark and punch the holes for the fixing tabs.

Taping up the seat in the DIY process

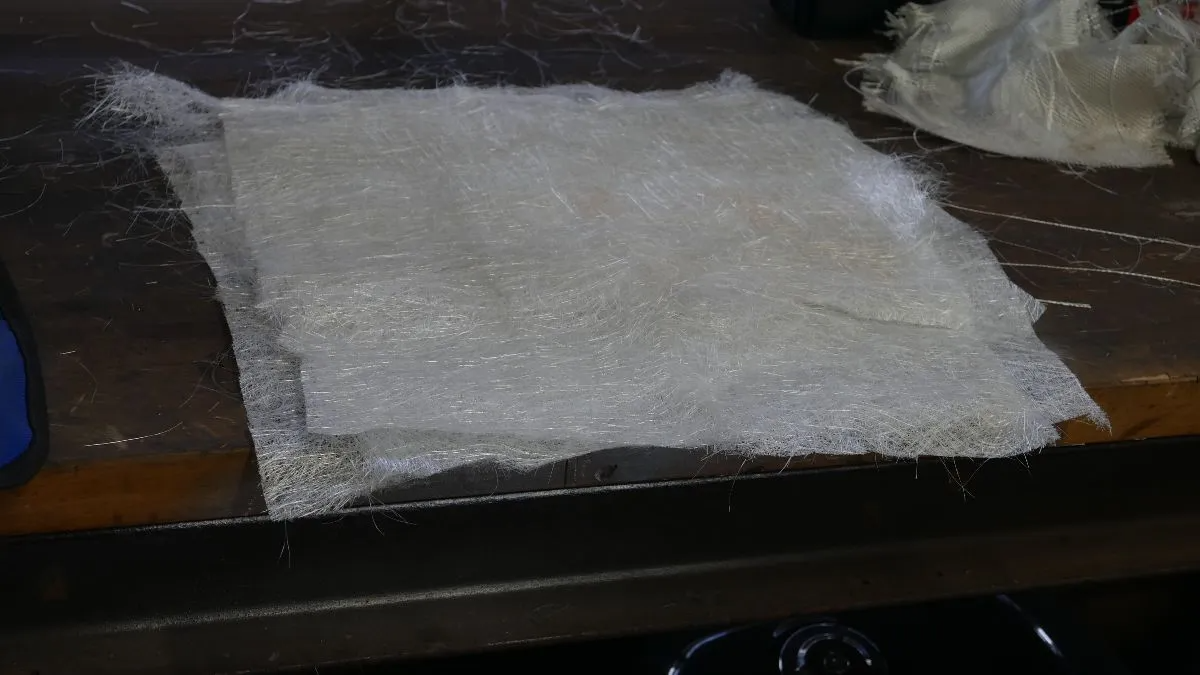
4. Prep for Fibreglass.

Cut out your matting and mask up any areas where resin may drip if finishing the seat pan on the bike. 3-6 layers here will do the trick, with your support bracket and fixing screws put in halfway through.

Cafe racer seat and tail DIY how to tech articles

5.Time to get glassing your cafe racer seat.

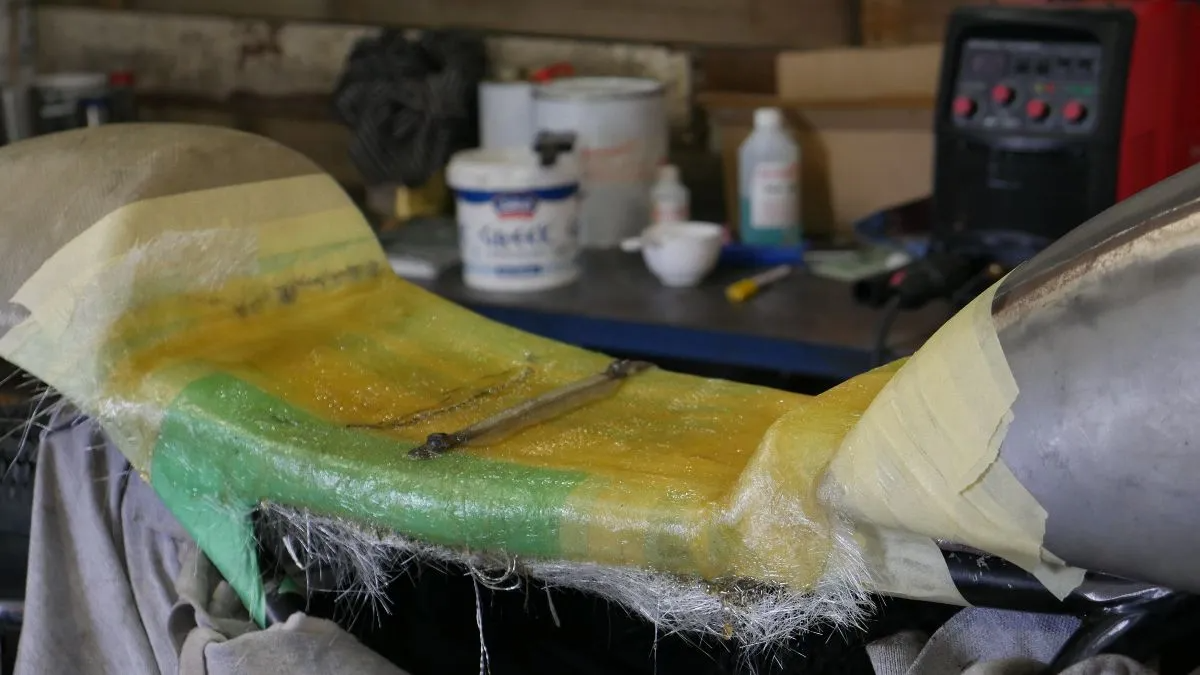
Mix your resin up at 1.5-3g Catalyst to 100g GP Resin. This will differ dependant on your climate, best to ask your supplier what they recommend when you buy it. On the Gold Coast I get all my supplies from a surfboard manufacturer but general hardware stores sell fibreglass kits as well. I will usually mix up 100-200g at a time depending on the size of the piece. You want to get 1-2 layers done per mix, let it start setting then move on to the next. Each mix will last 20-40 min before starting to lump and harden.

For the first layer brush on some resin before laying the matt down, then work from the top down with your brush soaking the matt in resin and removing any air bubbles. Use a dabbing action with the brush and don’t swipe side to side as it will drag the matt and cause weak spots. In between layers, I will let the resin start to “tack off” before laying the next. On Layer 2 or 3 put in the fixing bar, lightly move aside the fibres from over the tab hole with a knife or screwdriver and put the bar in. Making sure you get another layer over the top and plenty of resin to get the air bubbles out.

You can see the resin start to get a matte look and get a little stickier as it starts to set. Let each resin mix harden before starting a new one. Repeat this until all your layers are finished.

DIY motorcycle seat

6. Remove the seat pan and trim.

After letting the fiberglass cure 1-3hrs, remove the seat pan from the bike or bench. Take all the tape off and remove any of the support sheet metal and cardboard used. Get your safety gear on and trim the rough edges away from the seat carefully a bit at a time and use a finisher or sandpaper to finish the edges how you see fit.
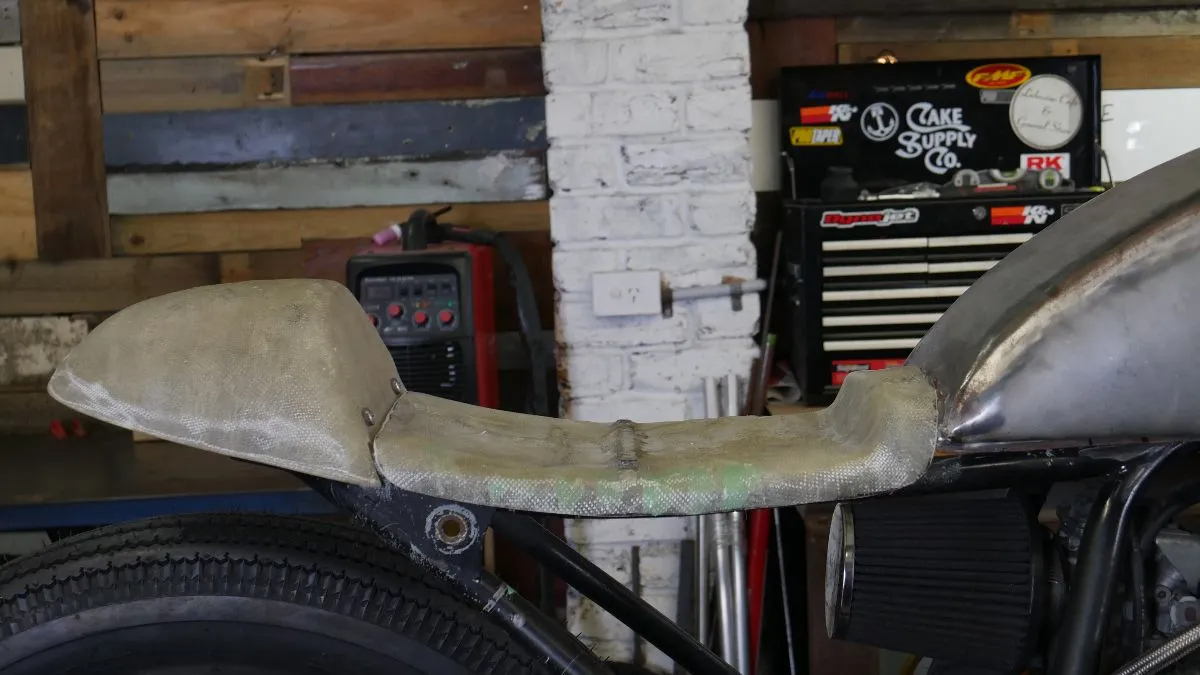
Fibre glassed cafe racer seat

7. Get comfy.

Once sanded you should be able to sit the seat pan on the bike and fix it perfectly. It will fit with the tank style, match the frame angle and be able to be fixed down and removed easily. These are the fruits of doing it right the first time. Now cut out some foam and shape your seat. You’ll need some contact adhesive and your rasp file here. I will always glue a few pieces together, glue it to the seat pan and then trim it back to get the shape right. Always finished on the bike so it runs right with my ideas on the overall look and feel of the finished product.

Finished scrambler seat

There you have it, from scratch in a few hours and as many beers as you like. A tailor-made seat for your custom café racer project. If you want to find out about making a tail cowl for your bike Click Here.

As always please leave any comments or questions below or email me. Always good to hear your feedback.

Thanks for taking the time.

Tom

Get a free quote for a custom seat here

About Tom

My purpose throughout this endeavor has been delivering the build experience to those who otherwise may not have ever had the chance. Taking an inclusive approach with your custom motorcycle project and focusing on making you a part of the experience. In parallel to this I also pour my energy into the manufacture of high quality, detail oriented and above all easy to install components for your motorcycle project.

14 Comments to “ How to build a Cafe Racer seat”

  1. Ciel says :Reply
    July 18, 2017 at 2:47 am

    Aloha Tom,
    Thank you for taking the time to make this tutorial. My boyfriend just got me a 1972 Yamaha CS5 so I can learn how to ride on a small bike. Might not be the perfect option, but here we are and we are looking to give a second life to her. Anyhow I am in charge of figuring out a new seat in our budget build. I have been looking all over YouTube etc for tutorials. There aren’t a ton of after market parts for fitting a “universal” seat to the Yamaha frame so I am pretty sure custom making a seat is the way to go. After I got to this point is the idea to upholster the entire seat and cowl or using this method can I also paint the cowl the color of my bike? Just wondering about possible design options. I can sew very well so I’m sure I can figure out the upholstery part (my sewing machine may not love it). The other question I have is if I have the old seat would it be better to mold everything onto that frame so I can keep the hinges allowing the entire seat to flip up like the original? And is the bottom of the sat pan enforced with metal or wood etc? Sorry in advance if the questions don’t make sense I am an extreme newbie. This is my part of the project so I am really excited and hoping to get it right. Mahalo, Ciel

  2. Tom says :Reply
    July 18, 2017 at 5:48 am

    Hi Ceil,

    No such thing as a bad question. I’m glad you asked.

    – yes you can paint the cowl, generally if you do it yourself. You’ll need to run a layer of body filler over it and sand it smooth then start your paint process.
    -you can use the original seat pan if you like, just re-foam Anne shape it to suit. Often the original seat pan won’t allow the profile I want so I don’t use it. But if it suits you that’s definitely and easier option.
    – if you do fibreglass a seat pan, the only re-imforcement I use is the cross bar on the 2 screws. If you use a general grade fibreglass Matt, and lay up 4-6 layers you should be fine.
    If the seat pan feels a little weak and you want it stronger, you can always add layers later. Just prepare the surface properly and repeat the fibreglass steps.

    Hope that helps and good luck with your build! Shoot me some pictures of the finished product 🙂

  3. Tim says :Reply
    October 17, 2017 at 6:40 am

    How do you attach the seat cover to the fiberglass?

    1. Purpose Built Moto says :Reply
      October 17, 2017 at 7:33 am

      Hey Tim,

      The seat cover and foam is attached with contact adhesive, staples can also be used on the seat cover but it’s not always necessary.

      Cheers
      Tom

      1. Brad says :Reply
        October 24, 2018 at 1:47 am

        My 2 biggest hangups are spacing for the material, and a locking latch on the back of the piece that will allow me to use my key to unlock/remove the seat (need something handy because I jumpstart my ride more often than I’d like to admit).

        How did you account for the spacing needed for the material that wraps around the edges of the seat when making the fiberglass? Take an educated guess?

        I’m attempting to make mine out of carbon fiber and would rather not have to make it more than once!

        1. Tom says :Reply
          October 24, 2018 at 4:49 pm

          Hey Bradley,

          You can use a run of cardboard around the edge to account for your leather thickness. I thought I mention that in the article.
          As for the locking latch, if your factory set up had one, re-use it. mark the latch position on your masking tape, remove the seat pan latch pin and place it in while the material is setting .

  4. Gillian Babcock says :Reply
    December 4, 2018 at 4:10 pm

    My brother has a motorcycle and wanted to make sure that he’ll have a good saddle. It was explained here that a good saddle is made of good sheet metal cover. Moreover, it’s recommended to go to trusted motorsports accessories for quality motorcycle saddle bag parts.

  5. Custom Motorcycle seats - Purpose Built Moto says :Reply
    May 14, 2019 at 1:42 pm

    […] part of this new venture Purpose Built Moto will be offering a bespoke seat building service on the side of our turn key custom bikes and parts manufacturing. Whether you need a simple […]

    1. Anonymous says :Reply
      May 27, 2020 at 8:38 am

      I’m

  6. Jeff Williams says :Reply
    September 9, 2019 at 9:04 am

    Hi, Tom, when you glass on toppa duct or masking tape, does the tape peel right off after the fiberglass sets? Or do you spray some kinda mold release over it first Thanks! Great how to, and you make it look do-able. I’m modifying an existing seat/pan (integral) to the shape I want. I can’t really go wrong… hah hah!

    1. Tom says :Reply
      September 9, 2019 at 9:52 am

      Hey Jeff,

      I use a PVA release agent and bee’s wax. it works pretty well, you just have to give the part a good scrubb afterwards with soapy water to get it off.

  7. ASH Green says :Reply
    November 14, 2020 at 7:49 pm

    Insanely comprehensive 🙂

    Thank you so much,
    Now I have something to read during the holidays. This will take a while but well worth it like always
    You can read another one here themotorbiker

  8. Jordan says :Reply
    December 2, 2022 at 5:22 am

    how do you fix the new fiberglass pan to the bike?

    1. Tom says :Reply
      December 5, 2022 at 3:21 pm

      BY using your eyes and reading this article! its all covered in there.

Leave a Reply Cancel reply

Your email address will not be published. Required fields are marked *

Our Parts Store

Shop Headlights

Our own builds use these cafe racer & scrambler headlights.


Shop Indicators & Turn Signals

Custom turn signals designed for a minimal style.


Shop Mufflers

Smooth note and a cafe racer style from our muffler collection.


Shop Tail Lights

Minimal and night piercing tail lights. From our shop to yours.


Shop Handlebar Switches

Custom handlebar controls for your cafe racer's wiring.


Fabrication Parts

Custom parts for fabrication.


Shop Lighting Modules

Control Relay Modules to simplify the electrics of your motorcycle


Air Filters

DNA Performance Filters

  • Shop Headlights
  • Shop Indicators
  • Shop Fabrication
  • Shop Moto Kits
  • Shop Air Filters
  • Shop Mufflers
  • Shop Tail Lights
  • Shop Buttons
  • Builders Blog
  • Installation Guides
  • Contact
  • Request a quote
  • Shipping and Returns
  • Request Wholesaler Account
  • Wholesaler Login
  • Sitemap
  • Privacy Policy

Payment Options

Payment Options

PURPOSE BUILT MOTO
Gold Coast, Australia

Call: 0467 417 828
Email: tom@purposebuiltmoto.com

  • GET SOCIAL
STORE
  • DIY Kit
  • Headlights
  • Indicators
  • Tail Lights
  • Handlebar Switches
  • DNA Air Filters
  • Mufflers
  • Custom Seats
  • Control Relay
  • Wheels
  • Fenders & Fabrication Parts
  • Wholesale Parts
  • Apparel
BLOG
  • Bike Customization
  • Parts Installation PDFs
  • Our Bike Builds
  • Lifestyle
  • Adventure Rides
ABOUT
  • Contact
  • Media
SERVICES
  • Motorcycle Customisation
  • Custom Motorcycle Exhausts
  • Motorcycle Mechanic
  • Motorcycle Rewiring
GALLERY
  • Videos
  • Cafe Racer
  • Brat Style
  • Scrambler / Tracker
WIN
  • STORE
    • DIY Kit
    • Headlights
    • Indicators
    • Tail Lights
    • Handlebar Switches
    • DNA Air Filters
    • Mufflers
    • Custom Seats
    • Control Relay
    • Wheels
    • Fenders & Fabrication Parts
    • Wholesale Parts
    • Apparel
  • BLOG
    • Bike Customization
    • Parts Installation PDFs
    • Our Bike Builds
    • Lifestyle
    • Adventure Rides
  • SERVICES
    • Motorcycle Customisation
    • Custom Motorcycle Exhausts
    • Motorcycle Mechanic
    • Motorcycle Rewiring
  • ABOUT
    • Contact
    • Media
  • GALLERY
    • Videos
    • Cafe Racer
    • Brat Style
    • Scrambler / Tracker
  • WIN
  • GET SOCIAL

2023 © Purpose Built Moto. All rights reserved.

TOP
View Cart Checkout Continue Shopping
[]