
Often when a customer comes in to talk over a bike they’ll go away and have a think (AKA get permission from the wife) before pulling the trigger. It’s a little odd though that drew and I first talked about his GN250 Scrambler in 2015 and it took until Late 2017 to finally get it moving! Between then and now he has lived in Japan for 12 months so that could have a little reasoning behind the extended timeline but I’m glad we finally got into it.
The project kicked off after we spoke again about some core points he wanted to hit:
- Classic scrambler style seat in a vintage aged leather
- MX/Scrambler looks and capability
- Custom Side Covers

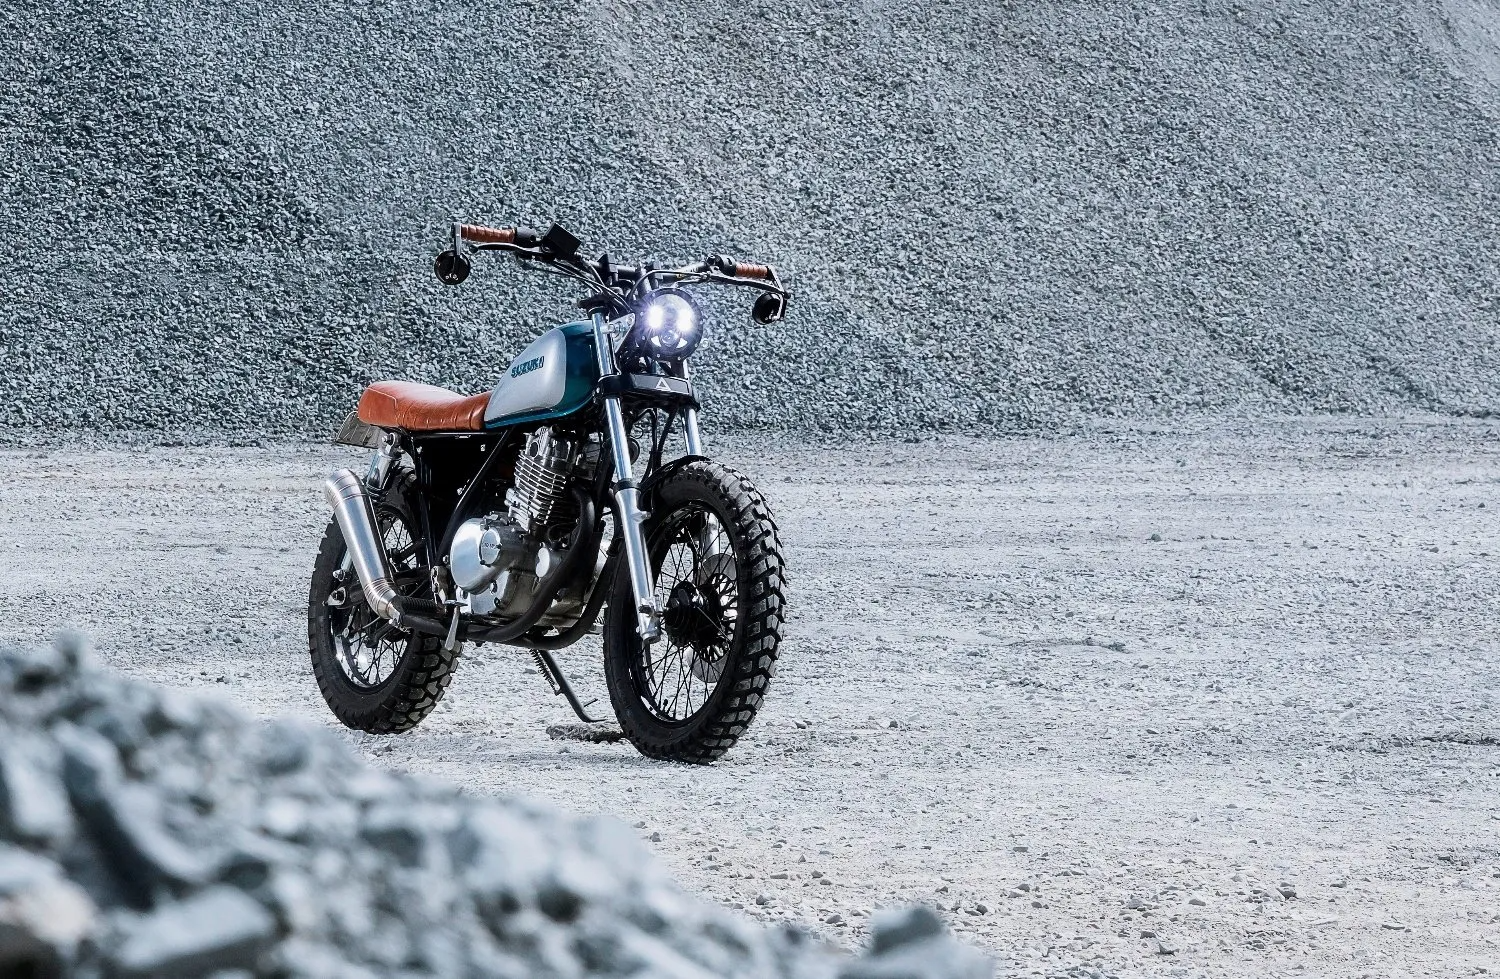
Drew had already played with raising the rear suspension a little and removing the air box, but other than that the 1993 GN250 was stock as a rock. He was reasonably open to all my ideas after seeing my past work, the only thing that took a little convincing from me was the colour scheme. Building a custom motorcycle is no exact science, sometimes it’s not until the last second you choose the seat style or find the right colour. As I already had bought the leather for the seat to kick off our in house seat building/upholstery service, The colour that slapped me in the face for the tank was a metallic teal. Writing it now I understand his concern. It sounds fucking horrible, “metallic teal” ugh…. But it looks killer so to hell with the name.
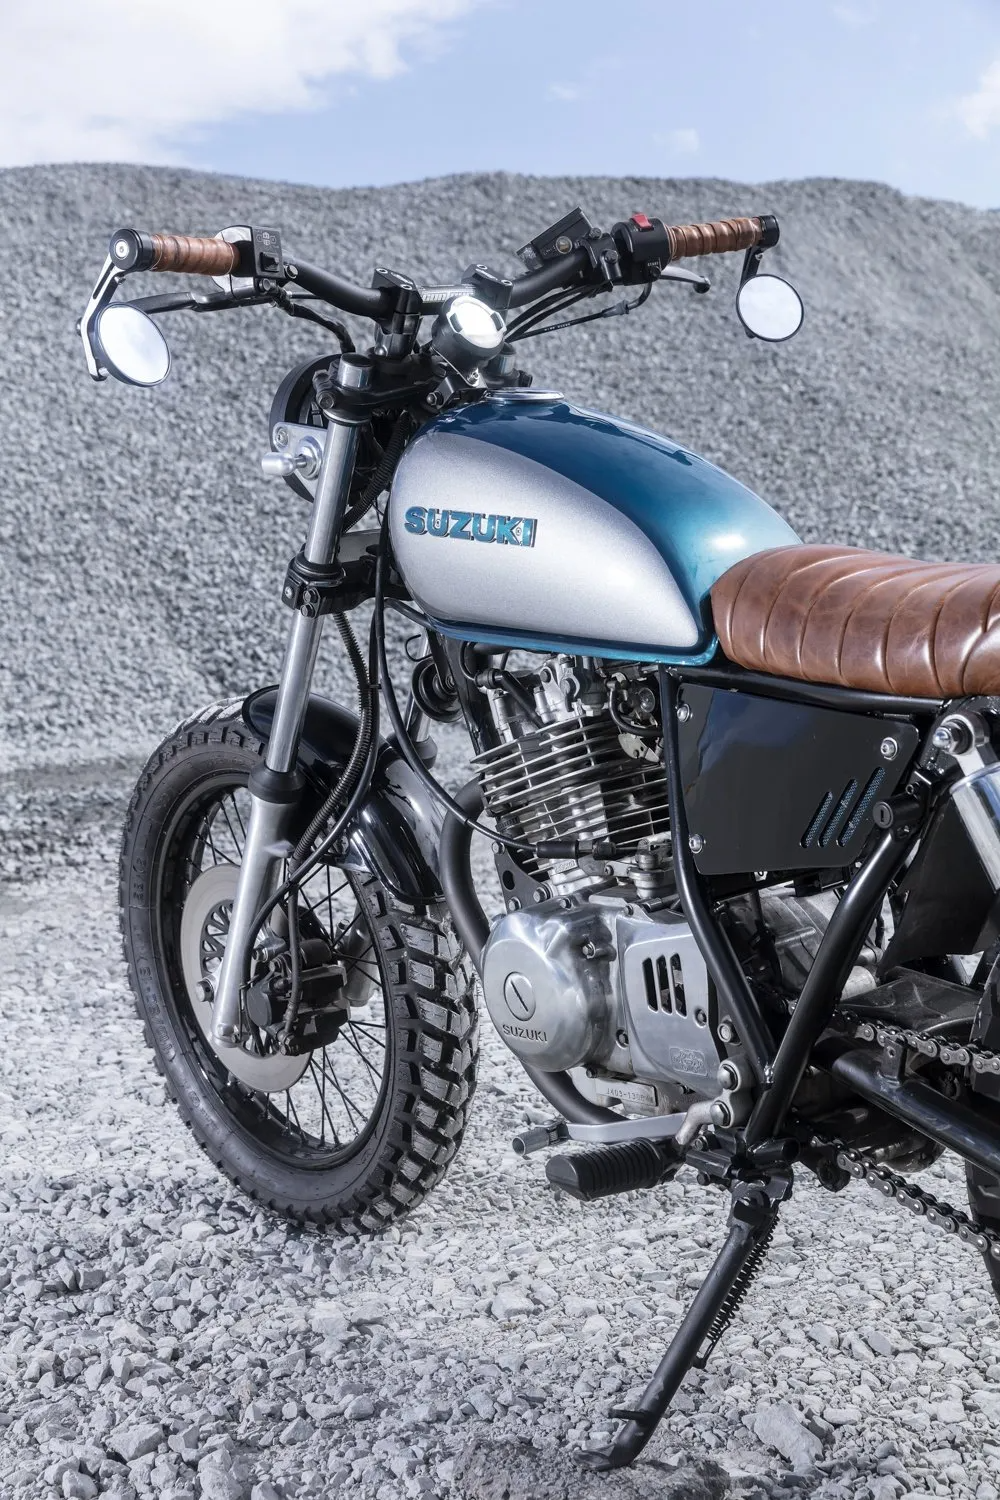
With a colour set in mind I set to work on stripping the bike down for the mods. The wheels were stripped and painted, fork tubes cleaned and re-finished and a new shorty front guard fitted. For this Suzuki Scrambler we used our ever faithful Heidenau K-60 Scout tyres. With a 110-90-19 on the front the front guard took a little massaging to fit but it was no great feat.
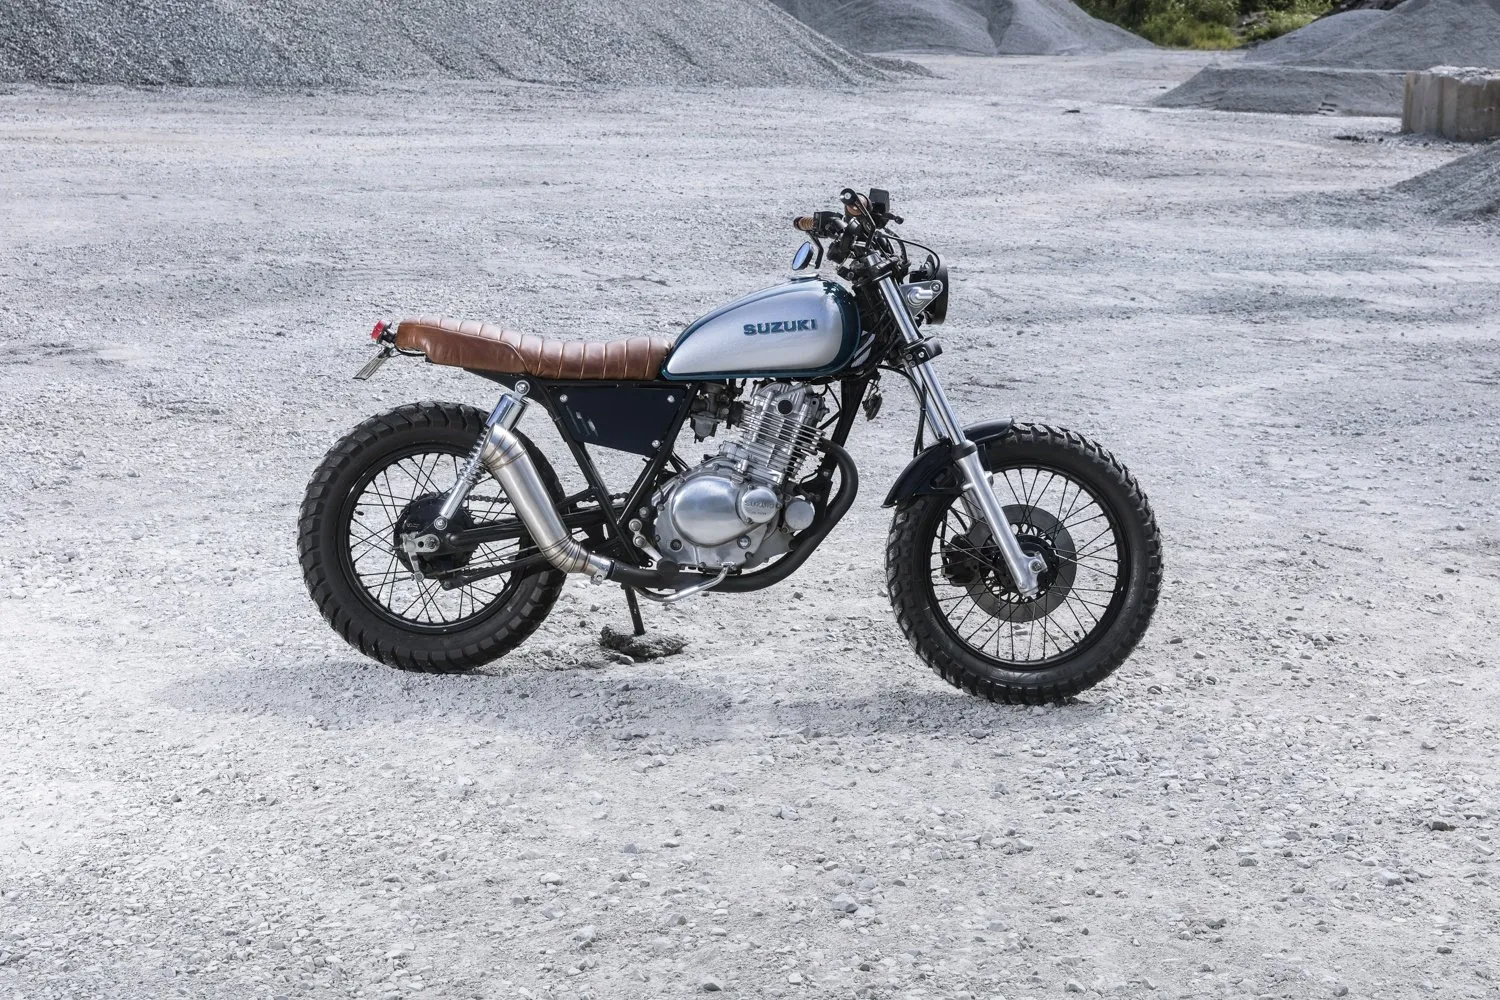
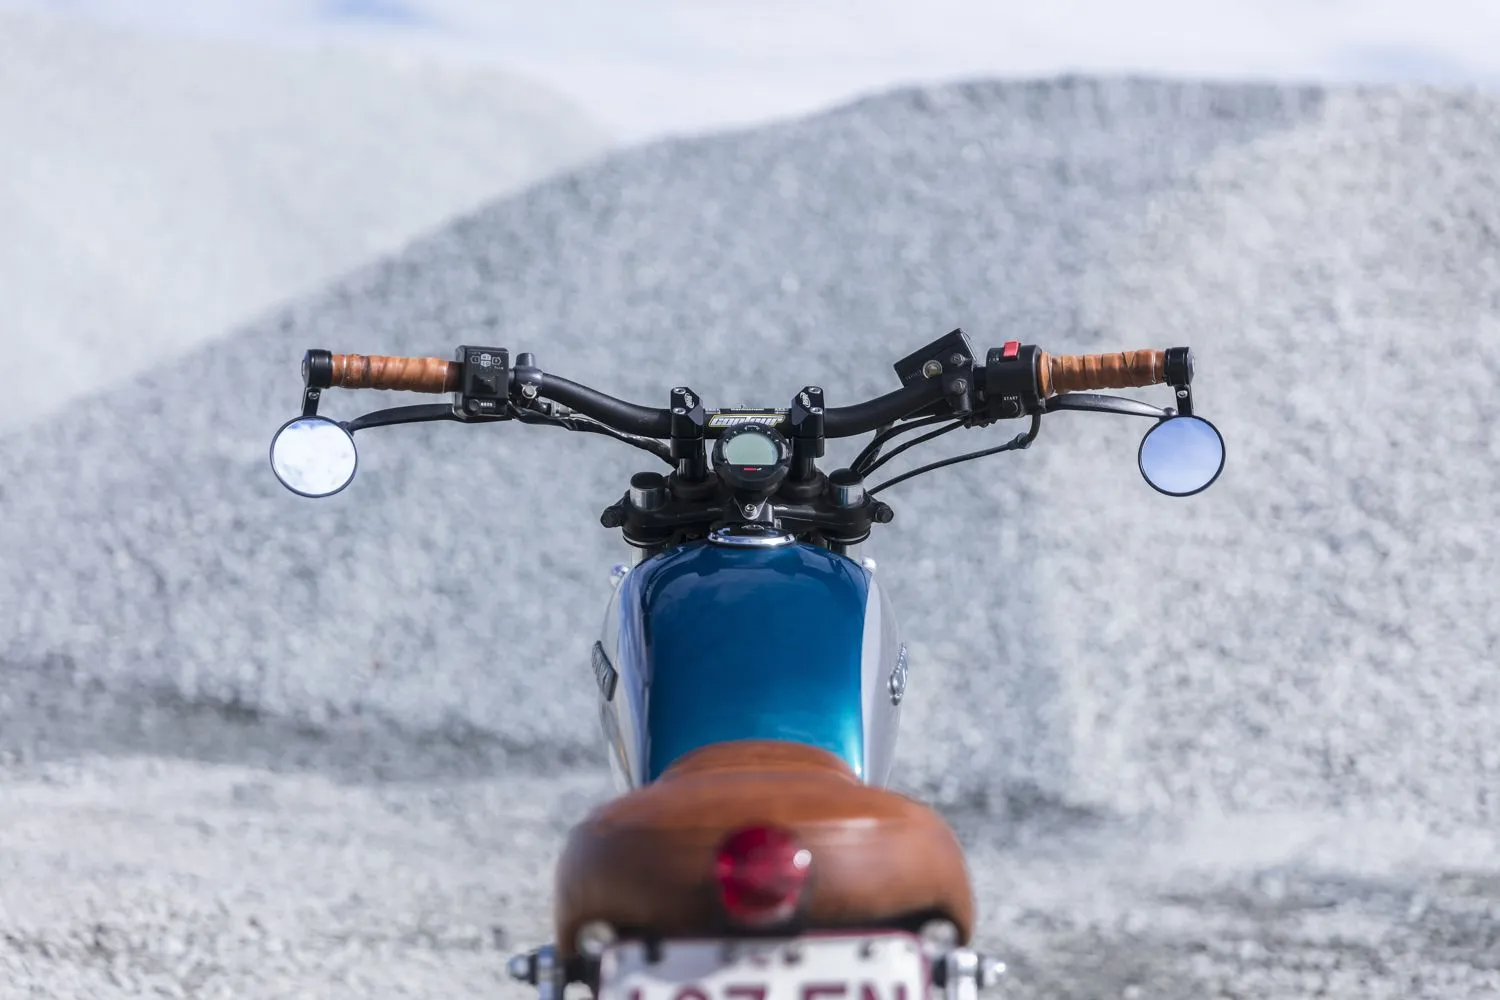
The rear frame was modified to suit the flat profile seat, with the standard guard removed and just utilizing the internal mud guard to keep the mud spray off the custom battery enclosure and DNA performance filter. When the seat pan was fabricated I added extra strength to the rear so I could use the seat pan to also mount the Tail light + Number plate with the turn signals being hidden inside the frame rails. It’s a little different to things I’ve done before but it helped keep the tail as minimal as possible (but still legal).
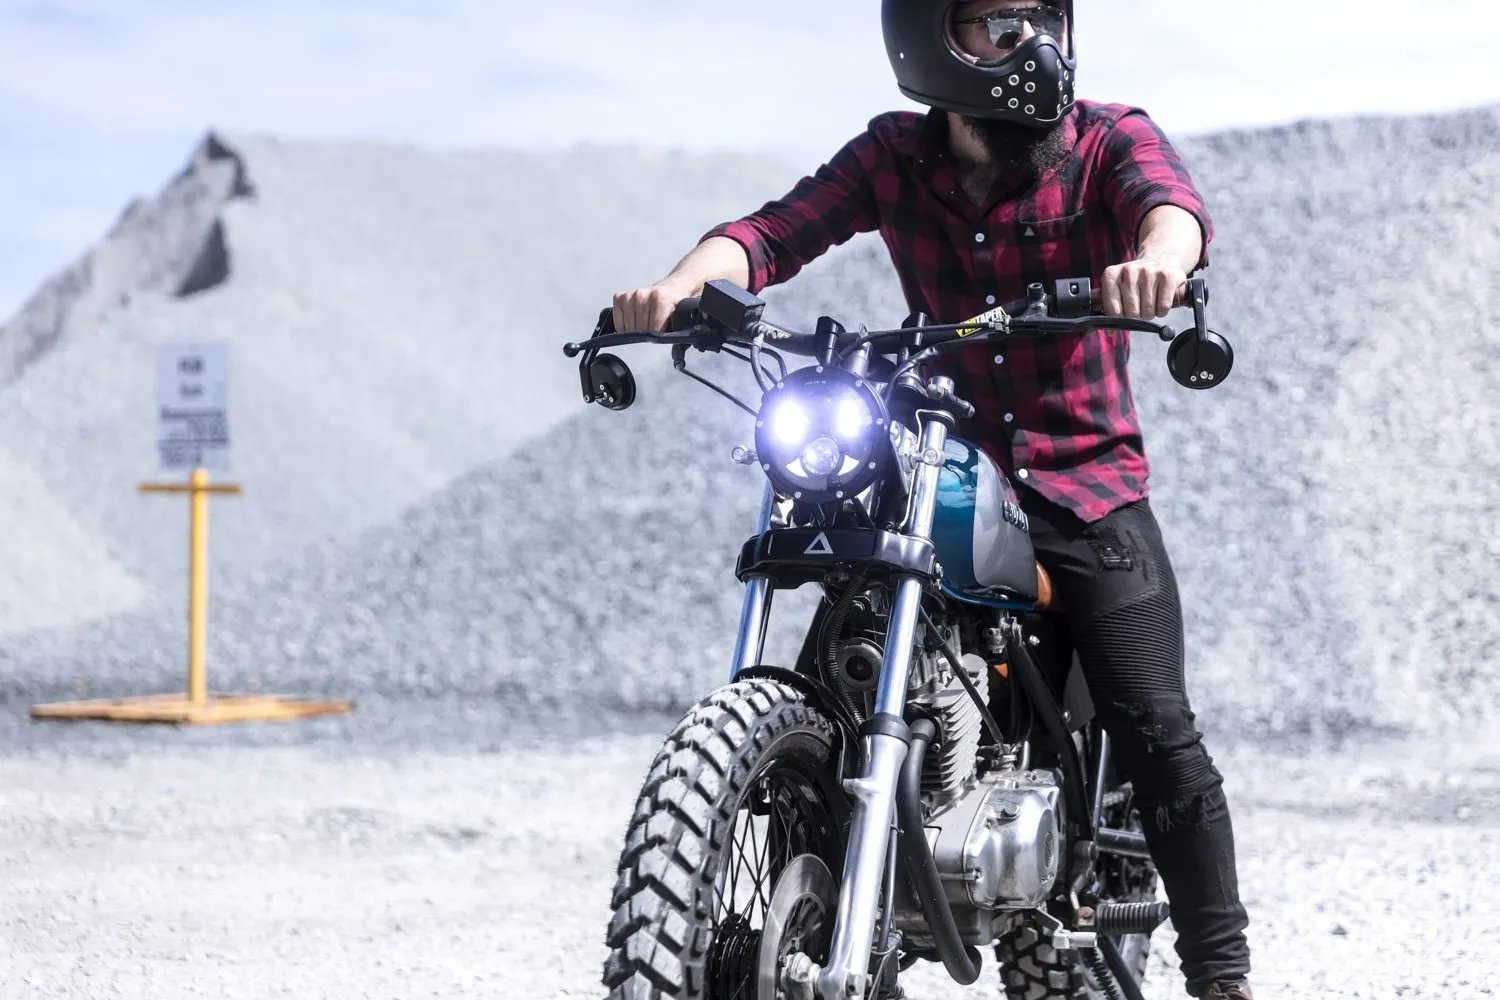
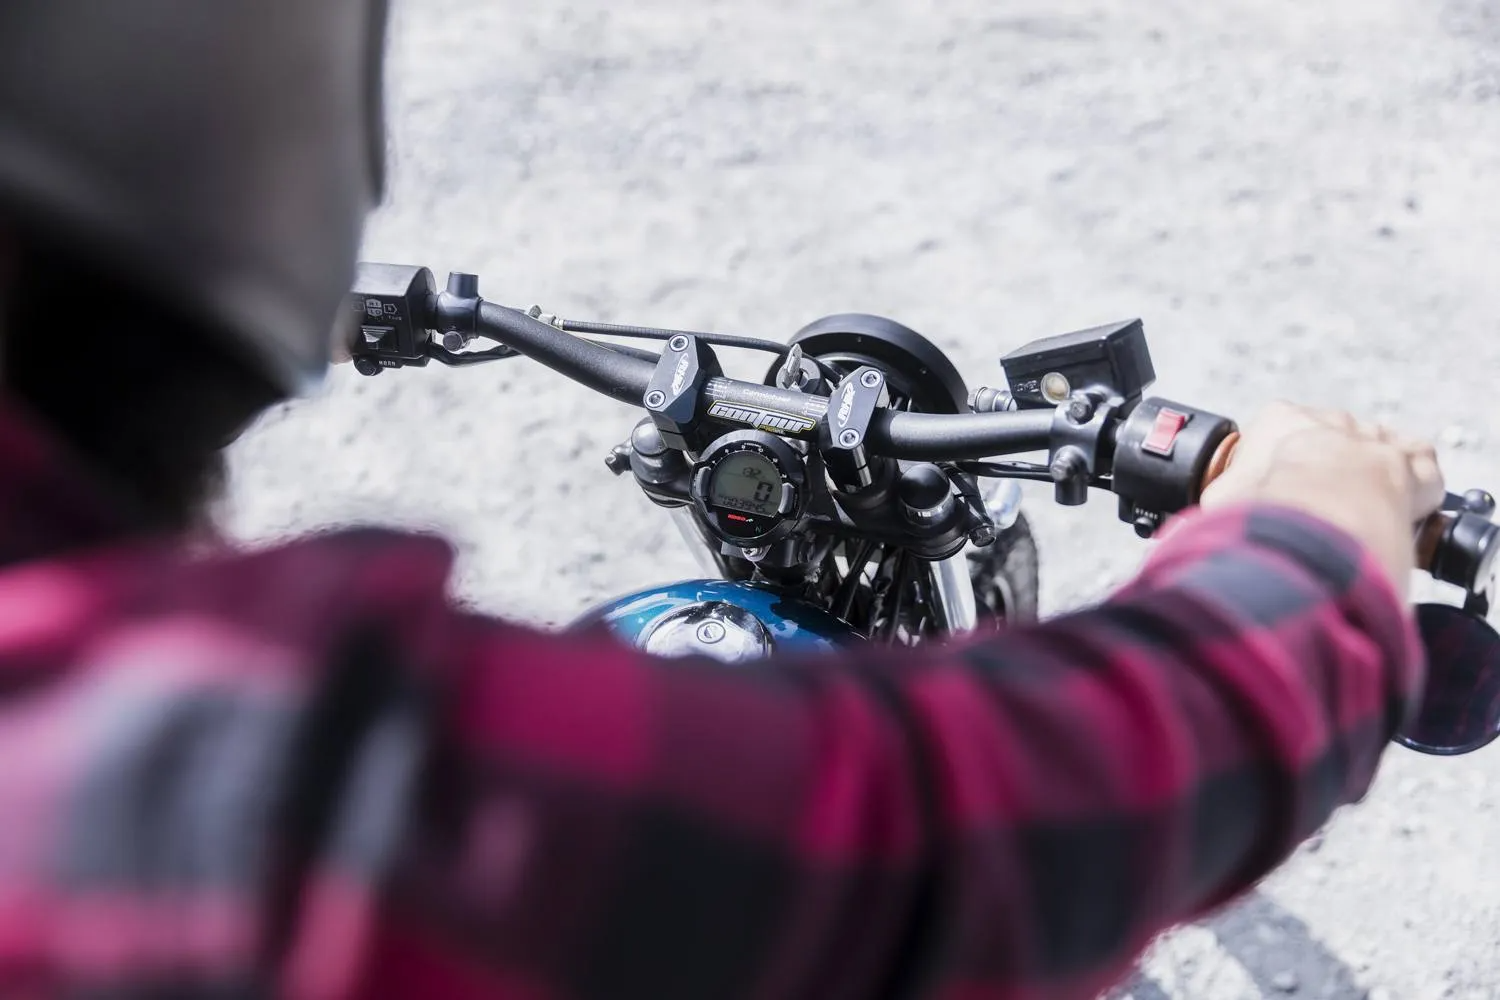
On the electronics side the GN250 was kitted with a 5.75” Flashpoint LED headlight and Beehive turn signals, along with that came a digital speedo from KOSO north America and an Antigravity Lithium Battery. Changing the bars to a Pro-taper contour helped lower the overall profile of the bike and instantly create an off road feel. The Digital dash was tucked just behind the bars in a nice inconspicuous spot that still keeps it highly functional.
Fabrication wise other jobs included the removal, repair and modification of the standard headers and the fitting of a PBM Highball Scrambler muffler. Last thing before paint was the custom side covers, The old battery housing was removed, and a new electronics tray/battery box welded up that allowed the covers to be much smaller. The side covers were patterned, cut and detailed by hand with saws and files until I got them right. After paint the final detail was to add some colour matched mesh in behind the vent cut outs.
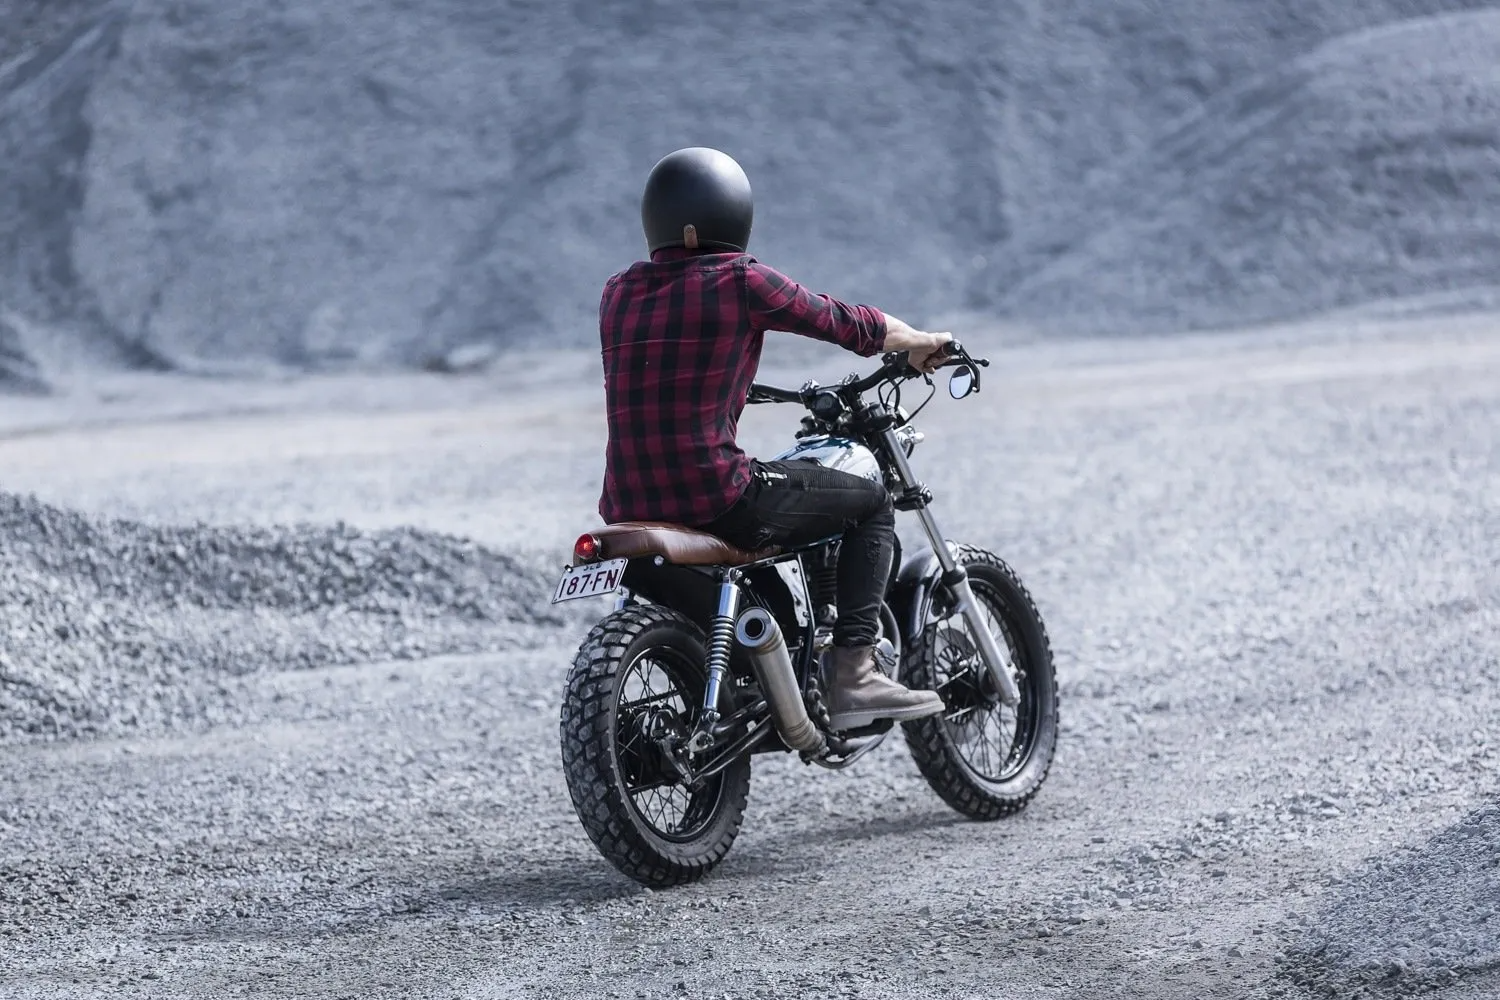
The scrambler was finished off in a deliberately subtle but classic style. The colour choice I wanted to keep it eye catching but not overpowering and the incredibly crafted seat finished the look off perfectly. In saying that we are in 2017, so the treatment of digital instruments and the PBM LED lighting system stops it from falling too far back in time.
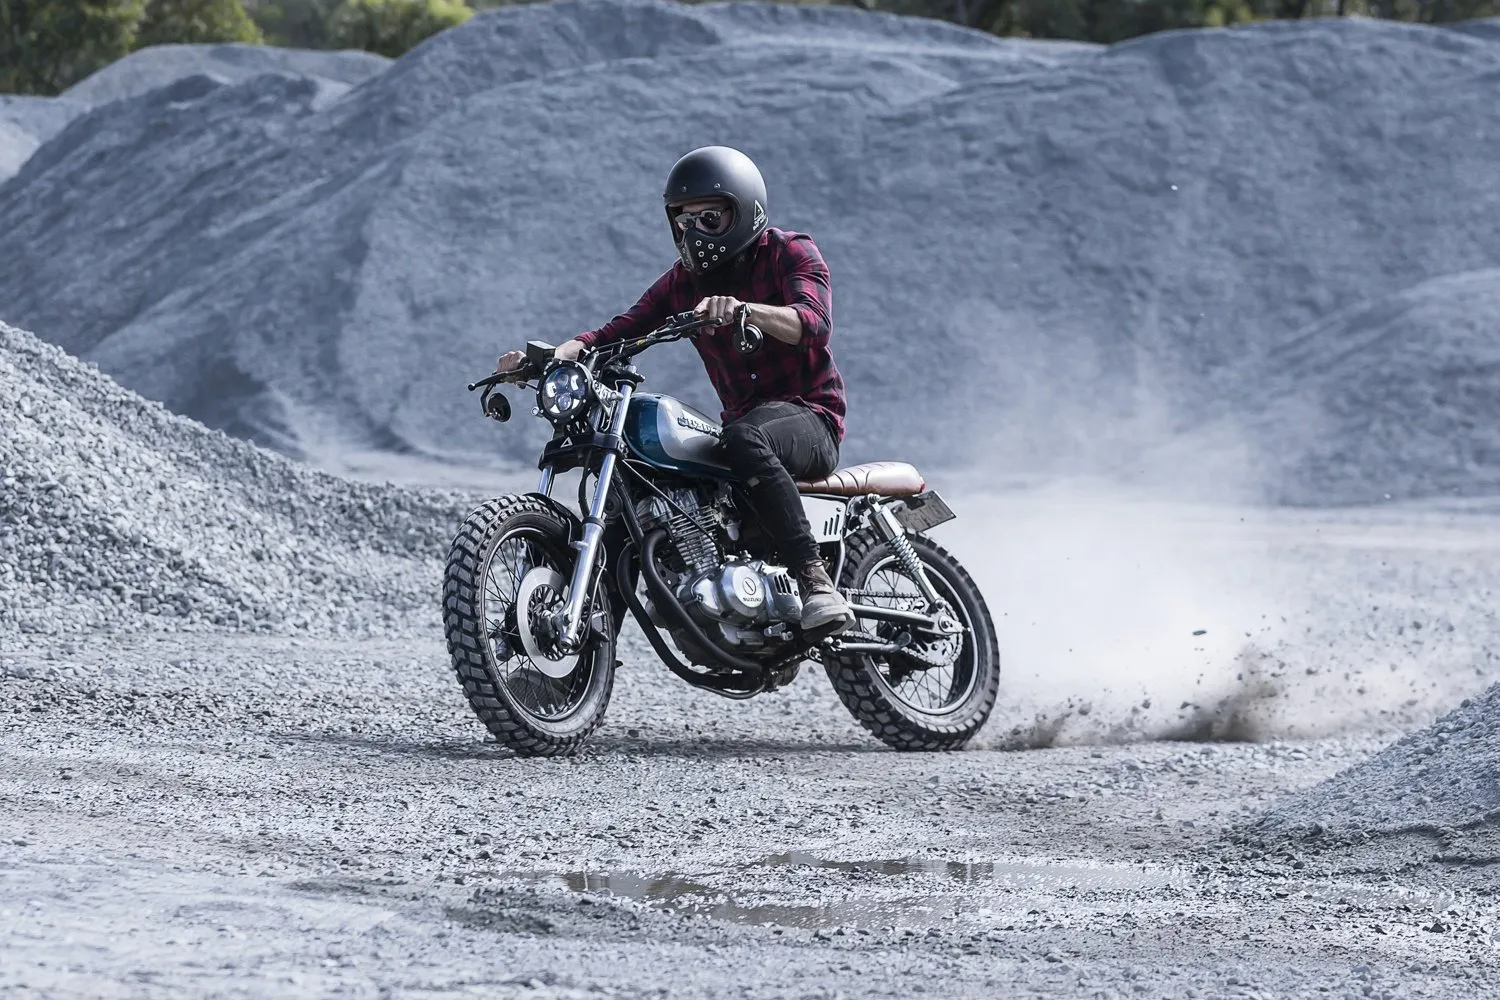
On the road around town the GN/TU250 is always a heap of fun. Punchy for a 250 and pretty nimble. Once you switch out the street tyres, lift the suspension and get some decent profile bars though, it comes into its own. They’re the perfect base for a fun off roader, the only thing they’re missing is a kickstart. It’s an instant smile dispenser as soon as you give it a handful on the dirt. I just Hope the rider treats it to a birthday bash every now and then up a gravel road or 2.
WE BUILD BIKES WITH PURPOSE.
Purpose Built Moto is home for unique custom motorcycle builds. We offer a unique motorcycle customizing experience in the heart of the Gold Coast.


39 comments
Great build. I’m fitting a GN250 with longer shocks and the brake linkage is stopping the swing arm like you said. How’d get around this? Bend it out of the way or shorten it?
Hey Marcel,
Yes you can fit a 100 or max. 110 front tyre on the stock rim.
Hey Guys!
Nice Job on the GN 250. This build is the reason i Got myself a gn250 1998. However its hard to go with the technical Regulations here in germany… this brings me right to the question: did you put that front tire on the stock 1.75 frontwheel rim? Would love to Know:)
Thanks a lot Tom
Hey Pete,
Yes mate, use a single bolt clamp.
Easy if you take the old bar clamp off to have a look if you arent sure.
Hi again Tom
Yes i can see you used another clamps to mount the handlebars. I look at these Pro-Taper clamps: https://www.steadygarage.com/store/pro-taper-universal-rubber-mounted-handlebar-clamp-1-1-8-honda-grom-125-kawasaki-z125pro
But i am concerned if they fit stock Suzuki GN250 (1998)?
Pete
Hi Tom
Contour bar need also another “clams”, right? Are they easy to “install”?
Pete