


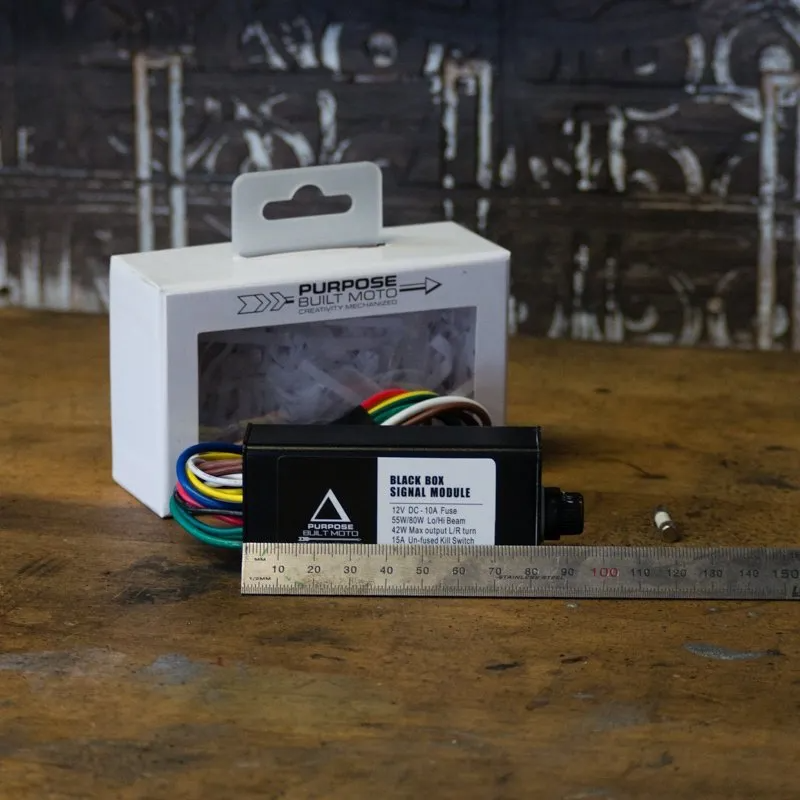
Purpose Built Moto- Black Box V2- Motorcycle electrics module.
A small Aluminium case full of magic. Our latest iteration of the Black Box motorcycle control unit is packed with even more functionality to make it easier to use than ever! Thanks to the feedback of our dedicated network of professional bike builders and garage enthusiasts, the Black Box control unit has undergone some serious upgrades.

Perfectly paired with a set of PBM push button switches, the functions of our electronics control module include:
- Left and Right indicators/ turn signals with auto time out
- Hazard mode
- Headlight Hi/Low beam switch
- Kill switch relay
- Inbuilt replaceable fuse
With the addition of the onboard fuse, and an all new kill switch circuit the Purpose Built Moto Black Box control unit is the simplest, and most cost effective way to handle all of your motorcycle switching needs. With a small case packaging hiding the switching module is as easy as stashing your first penthouse magazine under the mattress, it just disappears! During the re-design, simple installation was driving the improvements. Easy to install even if you have minimal knowledge of motorcycle electrics with a comprehensive installation diagram included.
Using a modern digital switching system this flasher relay and headlight module will handle any type of LED or incandescent turn signals without the use of resistors to balance the load. It’s a compact and durable unit that now has no need for external fuses.
The turn signal timing has 3 different settings:
Short press (L or R under 1.5 sec) – 5 seconds of flash then auto off
Long press (L or R 1.5 sec or more) – 25 seconds of flash then auto off
Dual press (L+R)- Hazard mode
With either channel being able to handle a maximum of 40W load.
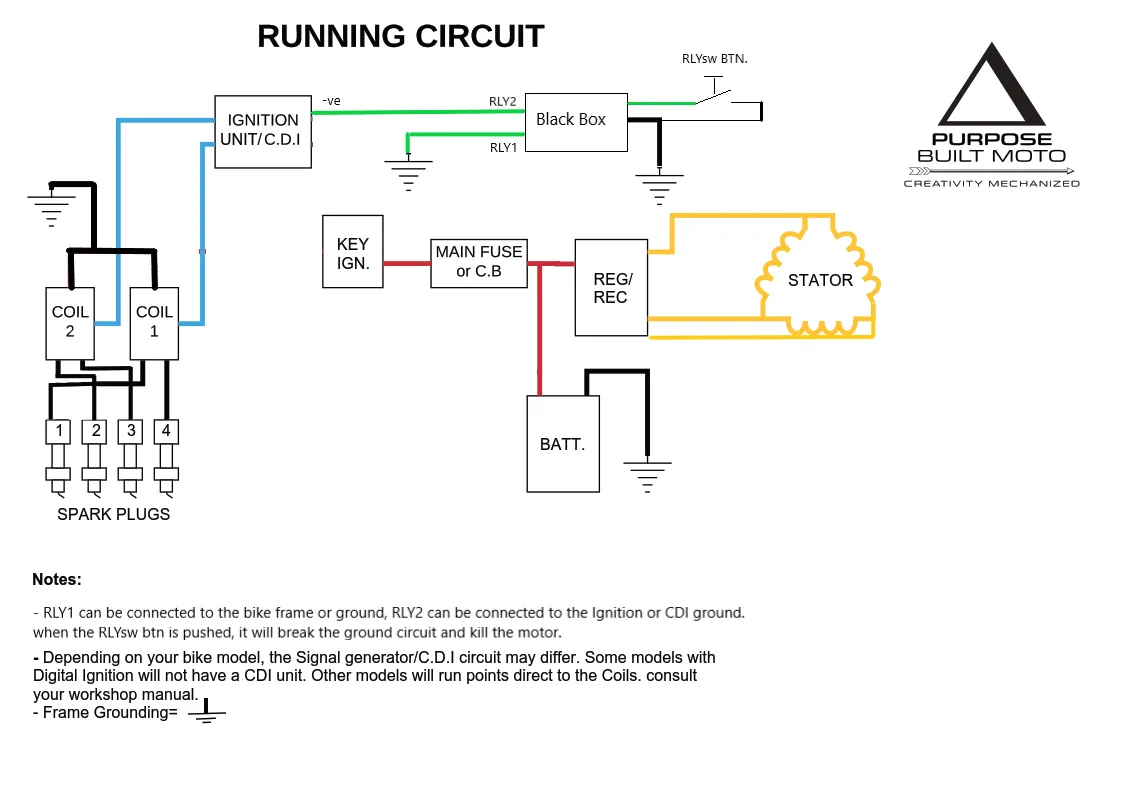
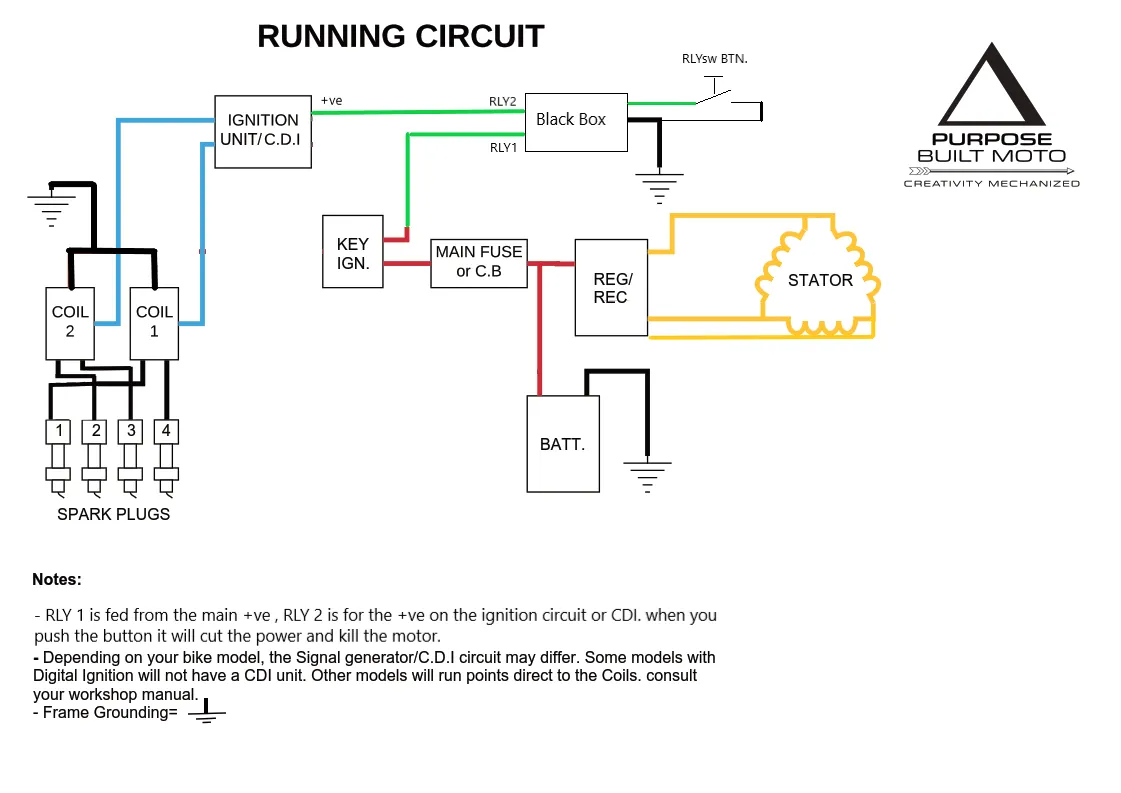
Headlight Control Circuit
The included Headlight control is functional through 1 button only.
Low Beam- always on
Short press- Flash High Beam
Long press – High beam locked on
This can be used to a max of 55W low beam and 80W high beam.
Headlight control can be used with applications including dual LED headlights, standard single LED headlights or your OEM incandescent motorcycle headlight.
Kill Switch Circuit:
Single push button control of the kill switch circuit
Shown as RLY 1 + RLY 2 on the wiring diagram
Normally closed contacts rated at 15A open and cut power to the ignition when the button is pressed.
Can be used to function on the positive or ground side of the ignition circuit
Suitable for points ignition, CDI and ECU motorcycles.
Some simplified example diagrams below.
Having the auto time out was imperative in providing the best possible product, in the world of custom motorcycles, clean is king and if you don’t have indication lights in your speedo or triple tree you no longer need to worry about riding with your turn signals on indefinitely.
Other modules sold on simplicity often include unnecessary functionality and therefor excess wiring is needed. With the Black Box Flasher relay, headlight control and Kill switch we have boiled the functionality down to the absolute simplest and most usable form. Brake switches can be wired directly and do not need any form of control present. This product is for the enthusiast with minimalism at heart, we’ve worked tirelessly to make the Black Box control unit painfully simple at its core.

WE BUILD BIKES WITH PURPOSE.
Purpose Built Moto is home for unique custom motorcycle builds. We offer a unique motorcycle customizing experience in the heart of the Gold Coast.


4 comments
onko black box v2 saatavissa suomeen —mikä hinta??
@anthony, This product has been superseded by our new model, you can purchase it here:
https://purposebuiltmoto.com/collections/control-relay
We also have some new install videos here:
https://www.youtube.com/watch?v=6AFTXFl-gXE&t=2s
Is this available for sale yet? In the shop section I only see the black box version 1.
How to install it