


Re-lacing and trueing your spoked wheels
If you’re chasing a properly vintage look on your project bike, one of the key parts of achieving that is a set of spoke wheels. Chances are on your old bike the spokes are either rusted or heavily weathered. Details matter, so when you have your bike apart strip the wheels and either clean up or replace the spokes with some new ones. A lot of bike mechanics won’t do it and will refer you to a specialist wheel builder as it can be a slow process especially if the rims you intend to use aren’t perfectly true. Hopefully, you’re brave enough to have a go at re-lacing the wheels yourself. With a bit of patience and a healthy respect for the time it takes to get it right, re-lacing and trueing your wheels can be an enjoyable and rewarding process.
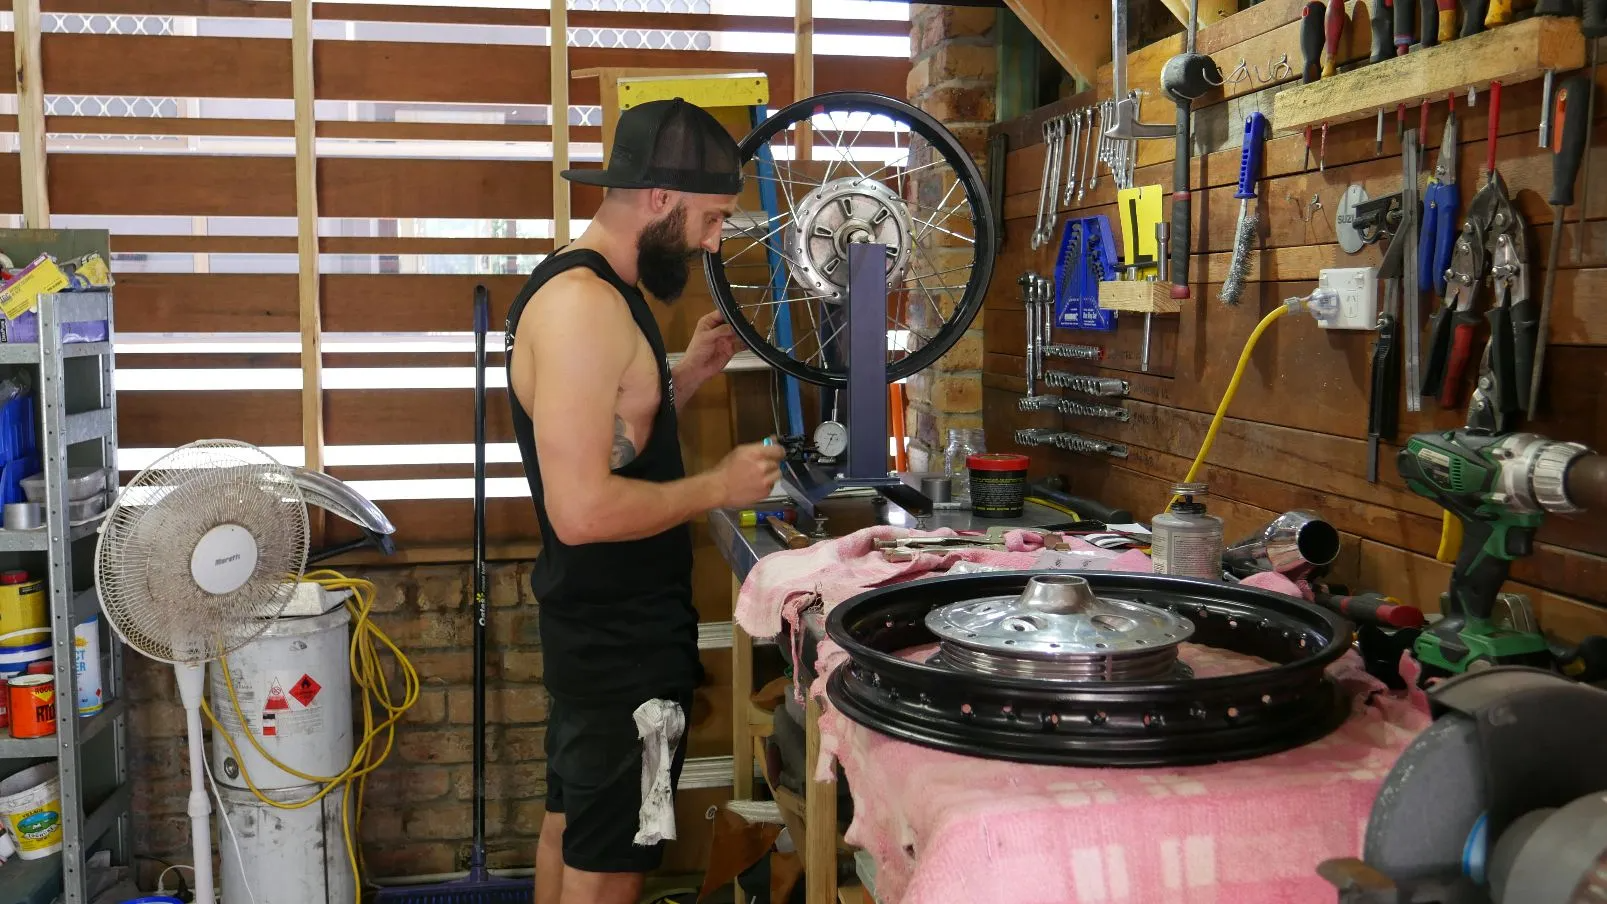
If you can get your hands on a trueing stand, this guide will give you the info you need to re-lace and true your old wheels. I learned this process out of necessity during a few of my projects, between books, a few videos and some help from a seasoned motorcycle mechanic this is the process I use in the shop when building spoked wheels.
What you need to rebuild a spoked wheel:
Ideally:
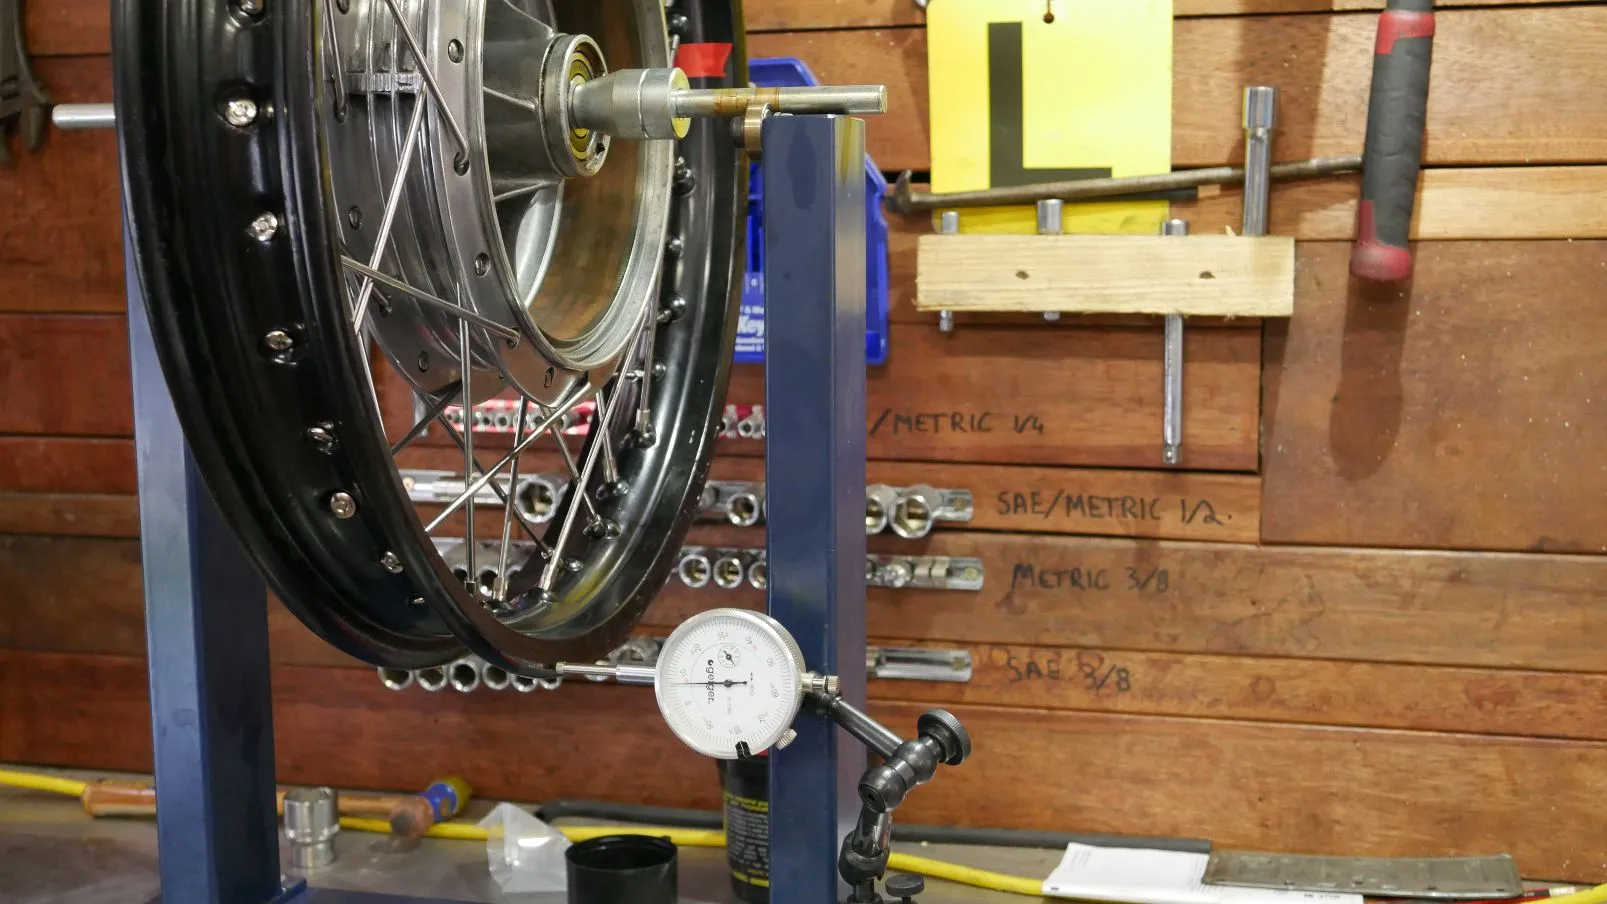
1. Trueing stand
2. Dial gauge
3. Spoke Torque wrench
4. Anti seize grease
5. Steel ruler
More likely:
1. Level bench
2. Makeshift stand + axle bolt
3. Spoke wrench
4. Anti seize grease
5. Steel ruler
Note: If you can’t get a trueing stand most would be able to make a simple jig up to suffice, it needs to be level on all axis’ and allow your wheel to spin freely. The dial gauge is also optional, if you have one great, if not a steel rule will do just fine.
Parts:
Spokes: You will have Inner and Outer spokes, the Inners have slightly less angle on the bend and will be installed first. If the rim is offset on the hub, you will have also dedicated left and right spokes.
Nipples: The “nuts” for your spokes
Hub: The center of your wheel, if you’ve stripped the hubs out, as a minimum you will need the wheel bearings in when you come to true the wheel.
Rim: Normally come in a 36 or 40 hole design in either Alloy or Steel.
Lacing the wheel:
This process will work for all standard pattern 36 or 40 spoke wheels, and if you aren’t confident in your ability get them checked by someone in the know.
Step 1: clear a bench area and tape up the inside of your rim, leaving only the nipple holes exposed. If you’ve re-chromed, powder coated or painted your rims this will protect them from getting scratched if you make a mistake and a spoke hits the rim. Your rim will normally have a pressed in number “RHK 18 x 2.15” as a rule of thumb this side will be the brake side of the wheel, mark it on the tape.
Step 2: Take your spokes, and grease all of the threads with anti sieze. Start by placing all the inner spokes on the one side of the hub, every second hole and angle them anti clockwise. Flip the hub over carefully and repeat on the other side. As you look at the hub from the top the Inners should be one hole slightly behind on the opposite side.

Step 3: Once all the Inner spokes are in, angle them in and place the rim around the outside. Take note to line up the marking on the brake side of the hub. Take one spoke and place it in the hole that matches the angle of the spoke meeting the rim. Thread the nipple on a few turns and move to the next spoke on the same side. Each inner spoke will have 3 holes in between them on the rim (every 4th hole). Complete this process for every spoke on the one side.
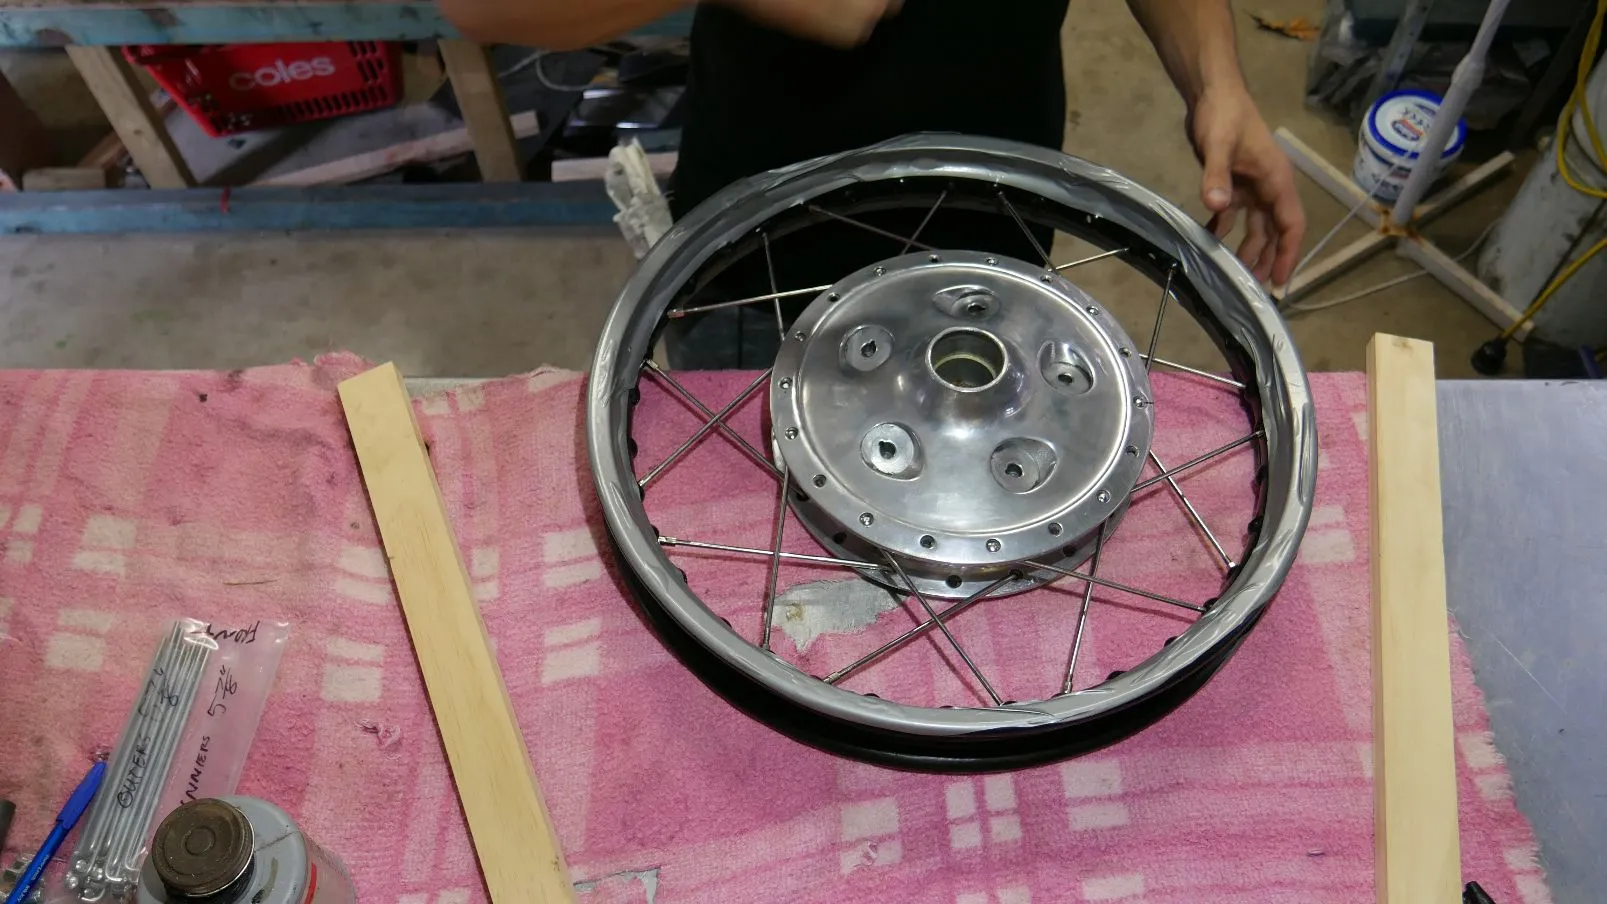
Step 4: Turn the Hub and Rim over taking care not to scratch the rim. Lace the Inner spokes to their corresponding holes, these should land next to the spoke from the opposite side. Only thread the nipples on a few turns to allow for movement in lacing the rest of the wheel.
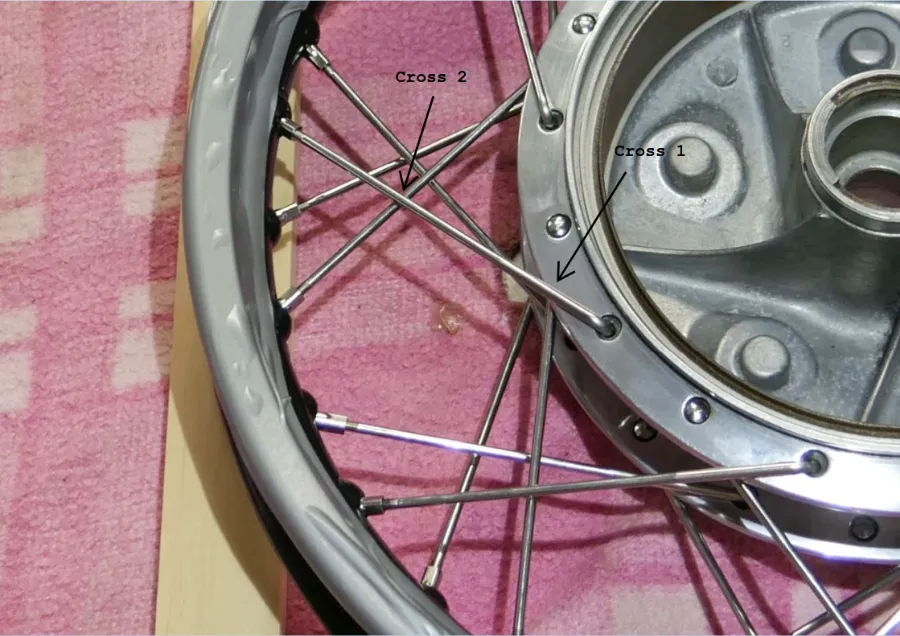
Step 5: Start with your Outer spokes, lacing 1 at a time and threading the nipple on as you go. Complete 1 side and then the other. When laced correctly each spoke should cross 2 other spokes, one close to the hub and one around ½ way down.
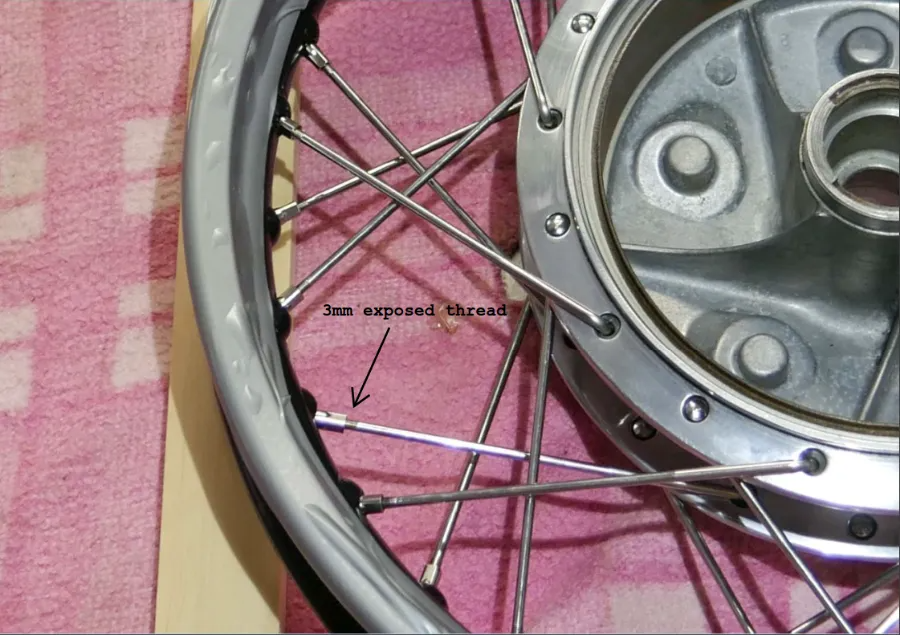
Step 6: Begin to tighten the nipples down onto the spokes, go around the wheel and tighten every spoke 1 by 1 so as to leave about 3-4mm of thread exposed. Once completed make a second pass and tighten each spoke to leave about 1mm of thread showing with even tension on all spokes.
Now you’re ready to true the rim, if you have the correct sized spokes and have completed the above steps correctly your wheel should be reasonably straight. If it’s not, with the right technique you can bring it in to line in no time at all.
Trueing your newly laced wheel.
Before you get going remove the protective tape and mark a reference point on the wheel with some electrical tape.
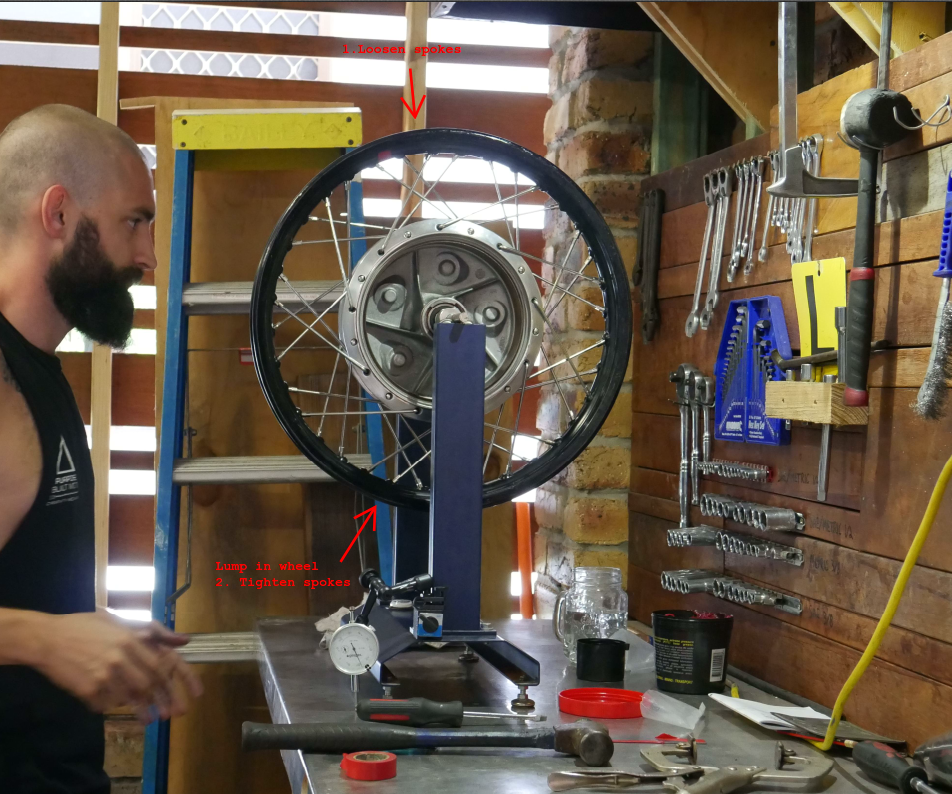
Step 1:Once your wheel is on the Trueing stand the spokes will loosen up slightly give the wheel a once over and adjust them all to an even tension. Just as you feel them to start tightening is where you want them at this point.
Step 2: I have come across 2 schools of thought on this step. First is to tighten groups of 3 spokes at a time on opposite sides of the wheel until you’ve completed 1 full sweep of the spokes. My mind doesn’t work like that so I’ll explain the second technique. Start at your reference point, tighten the first spoke after the tape, then skip 2 spokes and tighten the third. Continue this pattern for 4 full revolutions of the wheel. By this time you will have done every spoke to an even tension on the wheel.
Step 3: Here I check for lumps in the wheel. Get your steel rule and run a strip of electrical tape along the length of it and fold it over the top edge. This stops your wheel getting scratched if it contacts the rim as you rotate it. Clamp the ruler onto the trueing stand under the bottom edge of the rim leaving 1-2mm clearance. Slowly rotate the rim and check that the gap stays even. If the rim comes closer to the ruler stop and mark that spot, rotate the rim 180 degrees and you should notice the gap is a little larger than the norm.
loosen 3-5 spokes a quarter turn on the larger gap side and tighten 3-5 spokes on the lower gap side. Check to see if you have rectified the run out and repeat as necessary. Here you are looking for MAJOR lumps in the wheel, don’t stress on 2-3mm of run out just yet. This step only gives you an indicator you’re on the right track.
Step 4: Now to start actually trueing the wheel. Again put some tape over the end of your ruler and set it up so it is clamped next to the lip of your rim. If you’re using a dial gauge I will run a thin film of grease on the lip of the rim to avoid the gauge wearing on the paint or powdercoat. Start to rotate your rim and take notice of the gap getting smaller or larger. You want to work from the middle ground, if the gap is small in one spot and bigger on the rest, work toward the larger gap. If you have one spot with a larger gap and the rest of the rim runs a smaller gap pull the larger gap section in.
Looking at the wheel, the ruler/gauge is on the right side:
On a section that runs away from your ruler: loosen 3-5 spokes from the left side of the hub a quarter turn. Then tighten the opposing 3-5 spokes from the right side of the hub a quarter turn. Check for a result in evening the gap out and repeat as needed.
On a section that runs towards your ruler: Loosen 3-5 spokes from the right side of the hub a quarter turn. Then tighten the opposing 3-5 spokes from the left side of the hub a quarter turn. Check for a result in evening the gap out and repeat as needed.
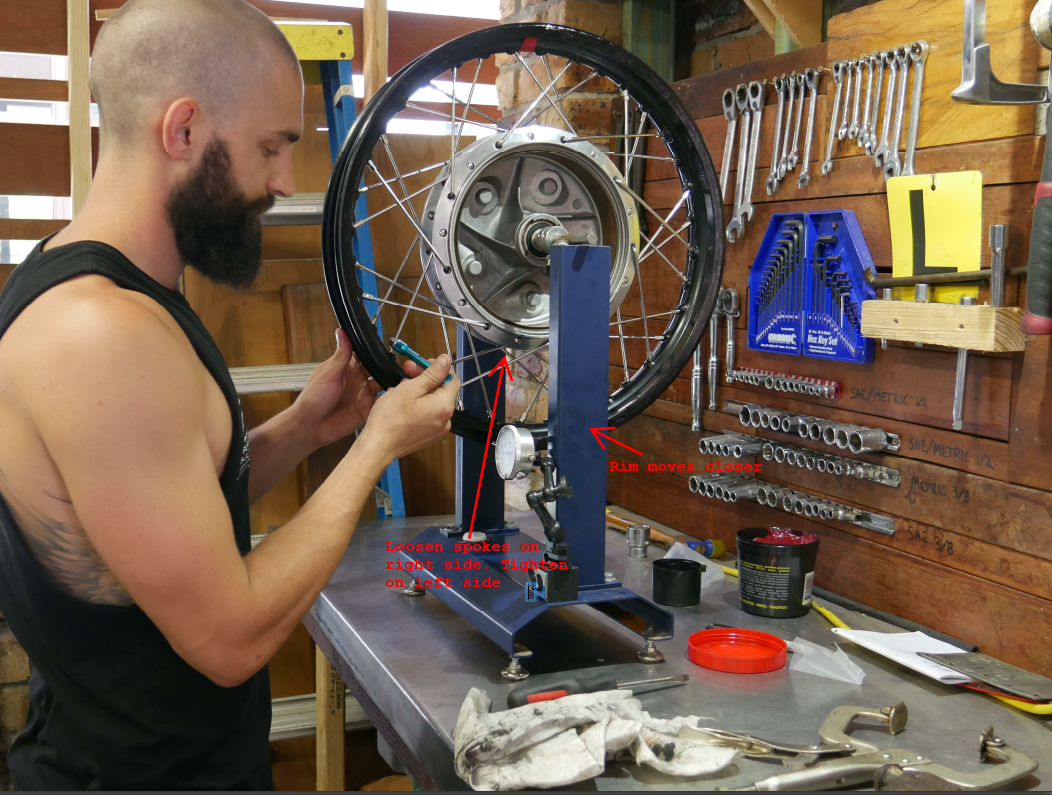
You will find most often if the rim runs in on one side, if you rotate the wheel 180 degrees it will run the opposite way. Keep at this until you’ve evened out the run outs and have the wheel within 1mm-2mm tolerance. Your finishing torque should be between 3-7Nm (that’s not much) its easy to over tighten a spoke so be careful to avoid that.
Step 5: Move the ruler back underneath the rim and double check for lumps. If you’ve Trued the wheel correctly and the rim is in reasonable condition there shouldn’t be a problem. If there is repeat step 3 bring it in to tolerance.
Step 6: run over the rim one full rotation and check that there is even tension on each spoke and no loose ones left out. Remember again your finishing torque should be 3-7Nm. The final check is a “tap test”. Start from your reference point and tap the first spoke with your spoke wrench, listen for a tight tinny ring. Skip along 3 spokes and tap the 4th you should hear a similar toned ring. Repeat on each spoke of the same type Left inner, left outer, right inner and right outer. Each will sound slightly different which is why I recommend to only do 1 type of spoke at a time. If one spoke is excessively higher or lower pitched you can slightly loosen or tighten it as needed. Your aim here is to provide an even tension on all spokes.
I hope you’ve got the info you now need to have a go at lacing your own wheels, If you have any Questions leave a comment below or send me an email.
WE BUILD BIKES WITH PURPOSE.
Purpose Built Moto is home for unique custom motorcycle builds. We offer a unique motorcycle customizing experience in the heart of the Gold Coast.


12 comments
Hi Bill,
Yes we can help with that.
If you get us the measurement and specification of the Hub, we can potentially replicate the hubs and have the rims specially machined to suit.
Shoot me an email and we can talk further
tom@purposebuiltmoto.com
I just ran across your website and possibly you can help me.
I am building a 1902 Olds curved dash retro and the wheels of that era were spoke type. I am not able to replicate that and currently I am leaning toward building my axles (F & R) with 4 bolt hubs. If I do this I will need a custom built spoke wheel that has the hub mounting pattern to match.
Question I have is this! Are you able to create a custom set of spoke wheels that are similar size of the 26 inch dirt motorcycle wheels? I do not have the specifications (bolt pattern) for the hubs I intend to use, however if I supply that can you do??
Bill Trammell
Iowa
Hey Jason,
Unless your model motorcycle came with a spoke wheel option there are a couple of ways to do it.
- Custom Hubs or wheels – We supply Jonich wheels which can be made to specification. You need to measure brake width, size, axle and total width of your existing hub and jonich will match that with a custom spoked wheel.
- retrofitting other wheels, again a lot of measuring ands making spacers to get another model bike spoked wheels to fit your application.
Is there a way to convert your cast wheels to spokes? The rims and spokes I can handle but how do you get the hubs right???
Hi mate great info, where do you get the spokes?
It is really important to protect your rims from getting scratched and powder coating is the best solution for it.
Hi Bill,
Yes we can help with that.
If you get us the measurement and specification of the Hub, we can potentially replicate the hubs and have the rims specially machined to suit.
Shoot me an email and we can talk further
tom@purposebuiltmoto.com