
We built a Custom Suzuki GSX1400 to be a sibling to one of our most popular motorcycle builds
Another behemoth motorcycle rolls into the Purpose Built Moto garage a custom Suzuki GSX1400, this time building for a familiar face. If you’re across any sort of custom motorcycle media, chances are you would have seen our Honda CBX1000. That custom took out a place in the Top 10 bikes of 2021 with Bike Exif, but more importantly blew our clients expectations through the roof on what was coming from inside our small Gold Coast motorcycle workshop.

Needless to say he’s been riding and enjoying the CBX1000 since it was delivered, but it got him so riled up he decided to send another one of his toys our way. His 2008 model Suzuki GSX1400, used as a sports tourer and commuter along the NSW coastal town where he lives. With reasonably low KM’s on the dial, and a pretty clean presentation my first question to our mate Luke was. What do you want to do with it?Our conversation cantered around mostly aesthetic upgrades, but with that would always come some mild engine performance mods, and better handling to boot. It’s hard not to improve a motorcycle when you’re dropping off so much weight and letting the beast breathe a little easier.So our plan was: rebuild the rising angular subframe, creating a shorter and sharper set of styling lines, and taking lead from where the CBX1000 build left off. A hybrid of sorts using some more classically driven styling DNA, but melding that in with a few street fighter-esque additions to create a far more overbearing presence.

We’ve been building a number of wild under tail exhausts lately, and when you’re doing a job like this it can take a lot of design brain power to make it both work from a performance perspective and look right as well. A custom Suzuki GSX1400 was no different, after the tear down, I noticed a significant hole between the engine and swing arm cross member. It was screaming at me to have an exhaust pass through it and out the tail. The problem was the subframe and tail didn’t exist yet.
“So where do I start?” I thought to myself. I needed to get the exhaust to a point where I could visualise the tail pipe placement to then build the subframe to suit. So with nothing but an engine cradle and a set of wheels I started the exhaust build. Retaining the heat shielded polished stainless headers, The exhaust goes from 4 into 2, then travels the length of the engine and gearbox before taking a sharp turn upwards through the swing arm which is where I placed the 2-1 collector that merges into a 3 inch tailpipe.
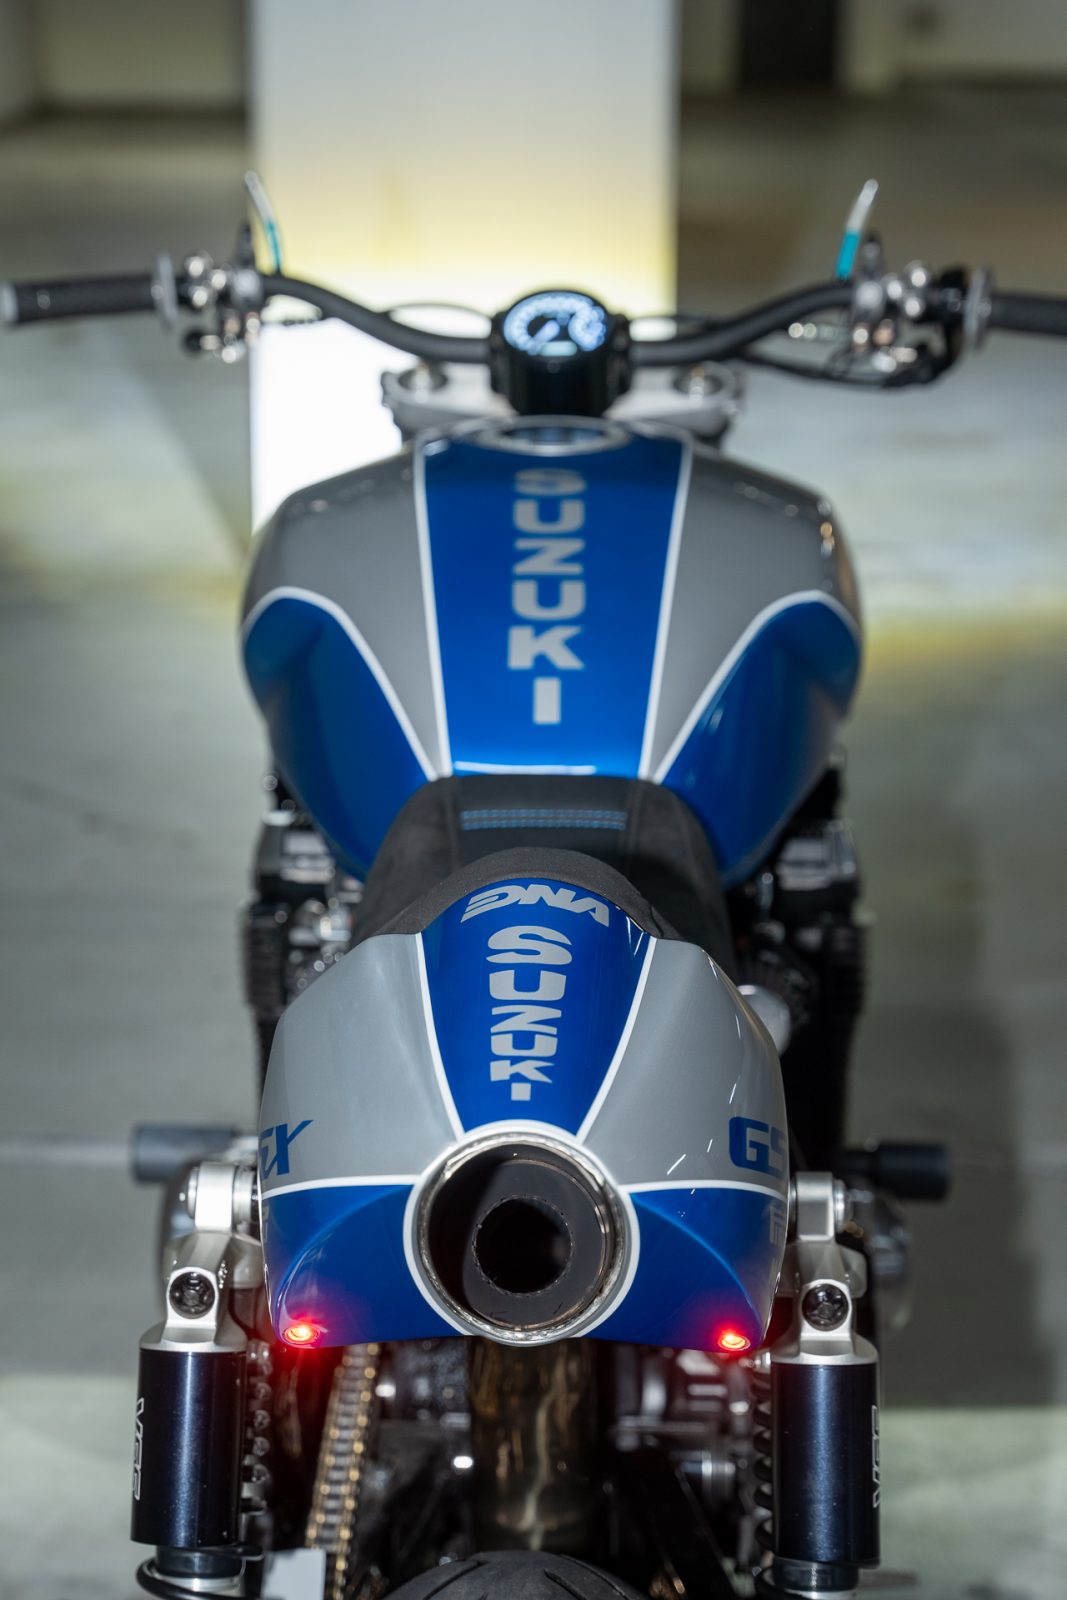
I’ve added some detailing under the seat with a set of tubes passing through the huge tail pipe. I could call it mechanical baffling, but they were just there for style so I won’t bullshit you. The engine is muffled with a perforated tubing and 2-stage packing that delivers a snarling but smooth note with that delicious crackle on overrun. The sound is to die for (you’ll see what I mean in the ride video).
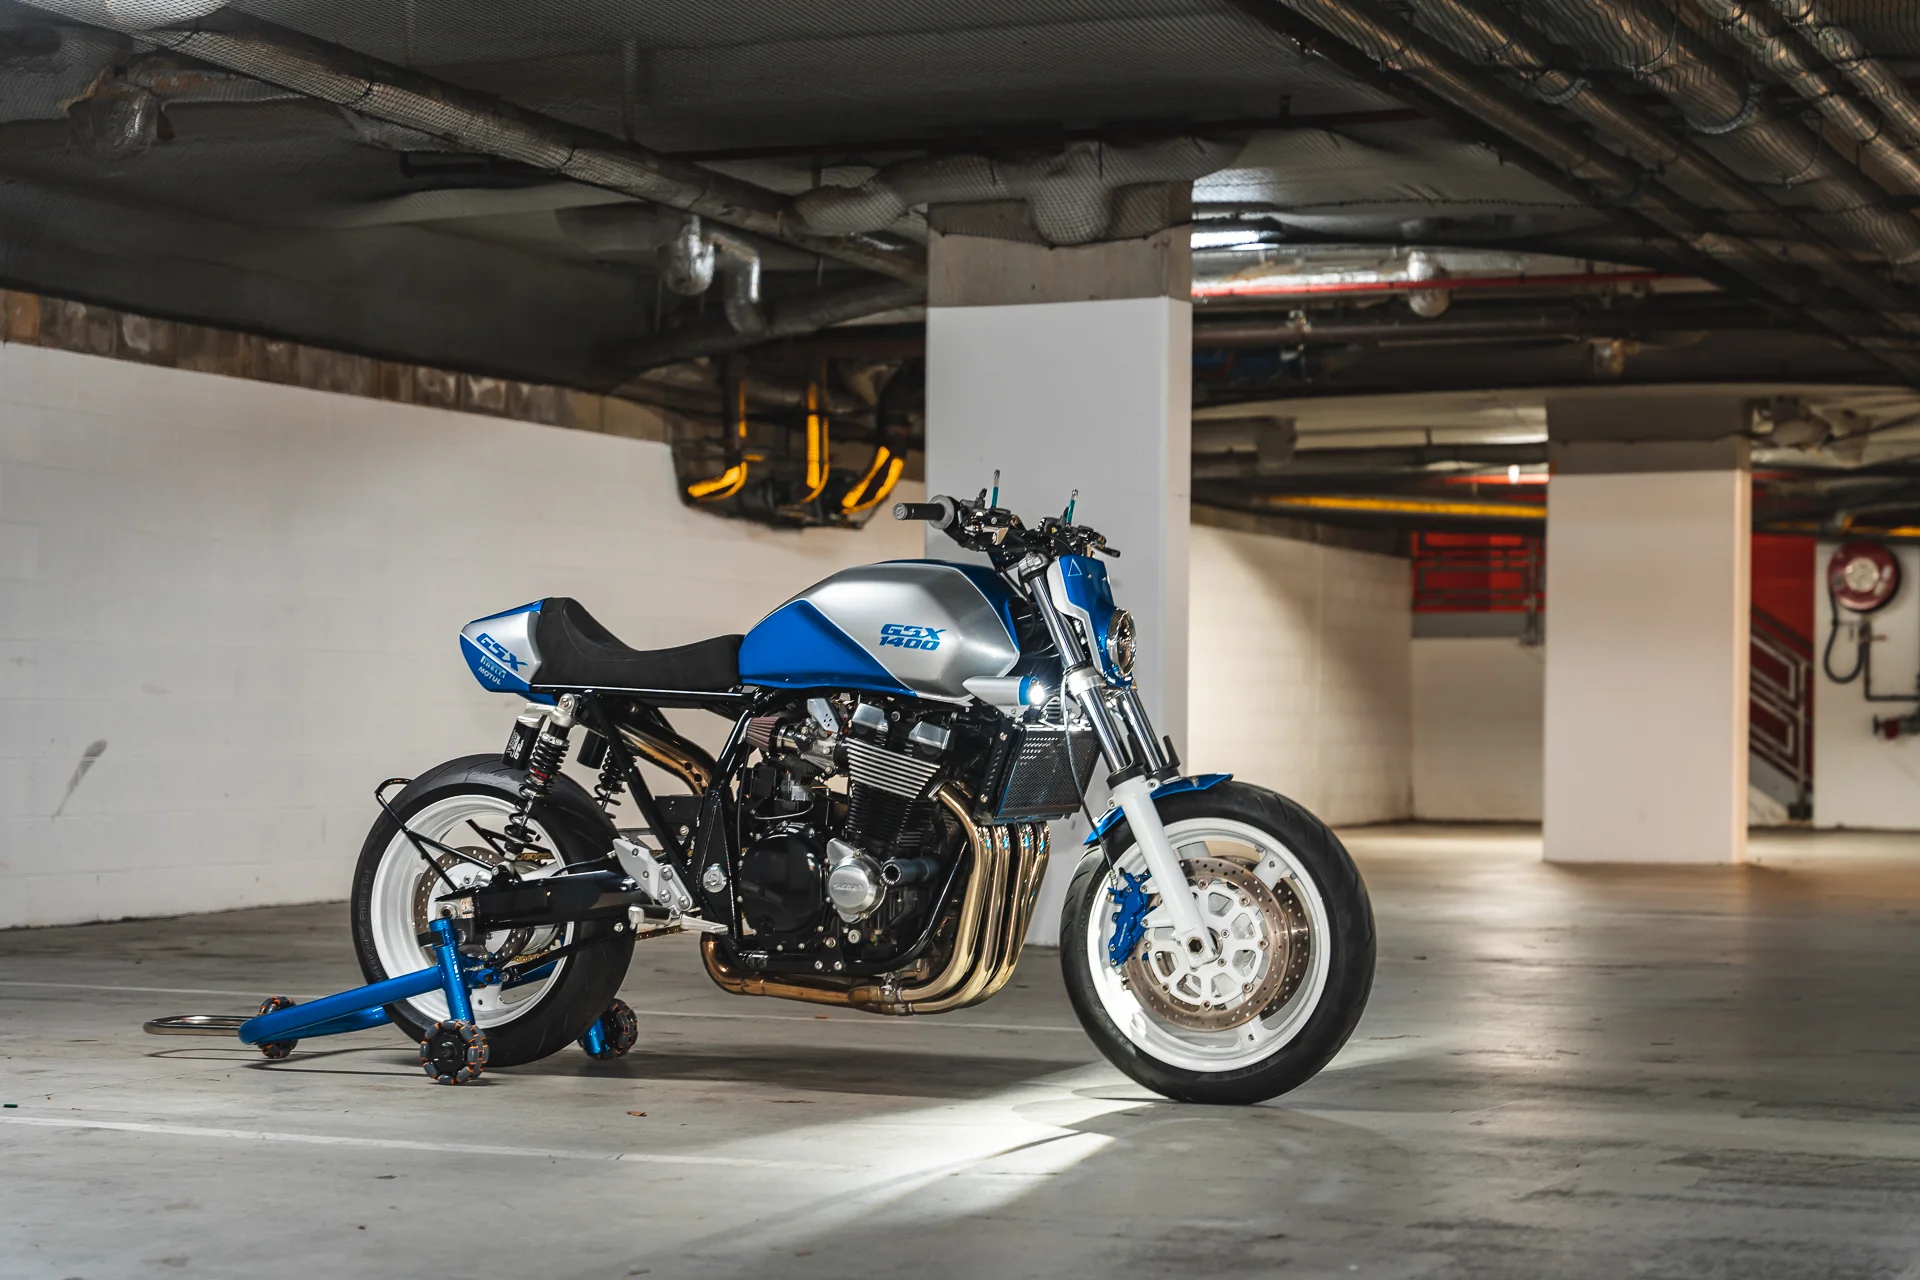
Before the exhaust was completely finished up, I had to build the subframe and rear suspension mounts. This was made painfully simple, some chromoly tube and a few nice joins off the existing frame to flatten the seat line out. A common upgrade for these bikes is to raise the rear suspension 15-20mm, this sharpens up the steering angle and gives the rider a much sportier experience. Leaning toward the way of the Sports, over the Tourer. We’ve achieved this by way of custom built 3-way adjustable YSS rear shocks. The only trick part on the subframe is the tail mounts, with 2 x M8 Threads in the frame ends to create a hidden mount set up for the tail cowl which was next on my list.
The tail cowl is Hand Shaped aluminium sheet. We’ve been exploring this more and more in the shop hand making fenders, side covers and all manner of crafty motorcycle parts, skilling up to always be building better bikes than we built last week. My problem is my imagination still outstretches my hand skill at times. This tail cowl is no easy shape to make, and has a lot of pre-requisites to adhere to. For example, hidden mounts, an integrated exhaust channel and seamless tail lighting all had to be ticked off the list as I made this. On Top of that, it had to build on and accentuate the style we were going for. To my mind we’ve done that. The exhaust passes through the tail in a heat shielded channel, with a long slash cut on the tailpipe matching the angle to the tail’s underside. The mounting points and lighting are integrated into a tunnel on each side. Once the tail is bolted on, the lighting is slipped into place and it all looks like it just floats there.
The bold shapes on the tail take notes from the powerful tank design with its broad shoulders and a few sharp edges. Making the seat to accentuate the tail was another key part of the build. Making sure the rear of the seat lets the shoulders of the tail show to let the muscular shape shine through. Once the shape and design was finished up we sent it off to be covered in black Alcantara at Timeless autotrim.
To keep the tail unencumbered we’ve fabricated a swing arm mounted number plate bracket allowing the plate to wrap around the back wheel and give you a full view of the epic exhaust and tail section from behind.
Having finished that I moved to the front end to finish up fabrication. Being a later model machine, that gave us licence to get a little more creative with our headlight and front plate set up. The idea was to create a simple lighting plate, and integrate one of our 4.5” LED headlights using this as the high beam. Off the Oil Cooler we’ve mounted the low beam, a pair of small projector lights that have had a set of shrouds shaped up to cover them in and tie in with the other body work we’ve fabricated.
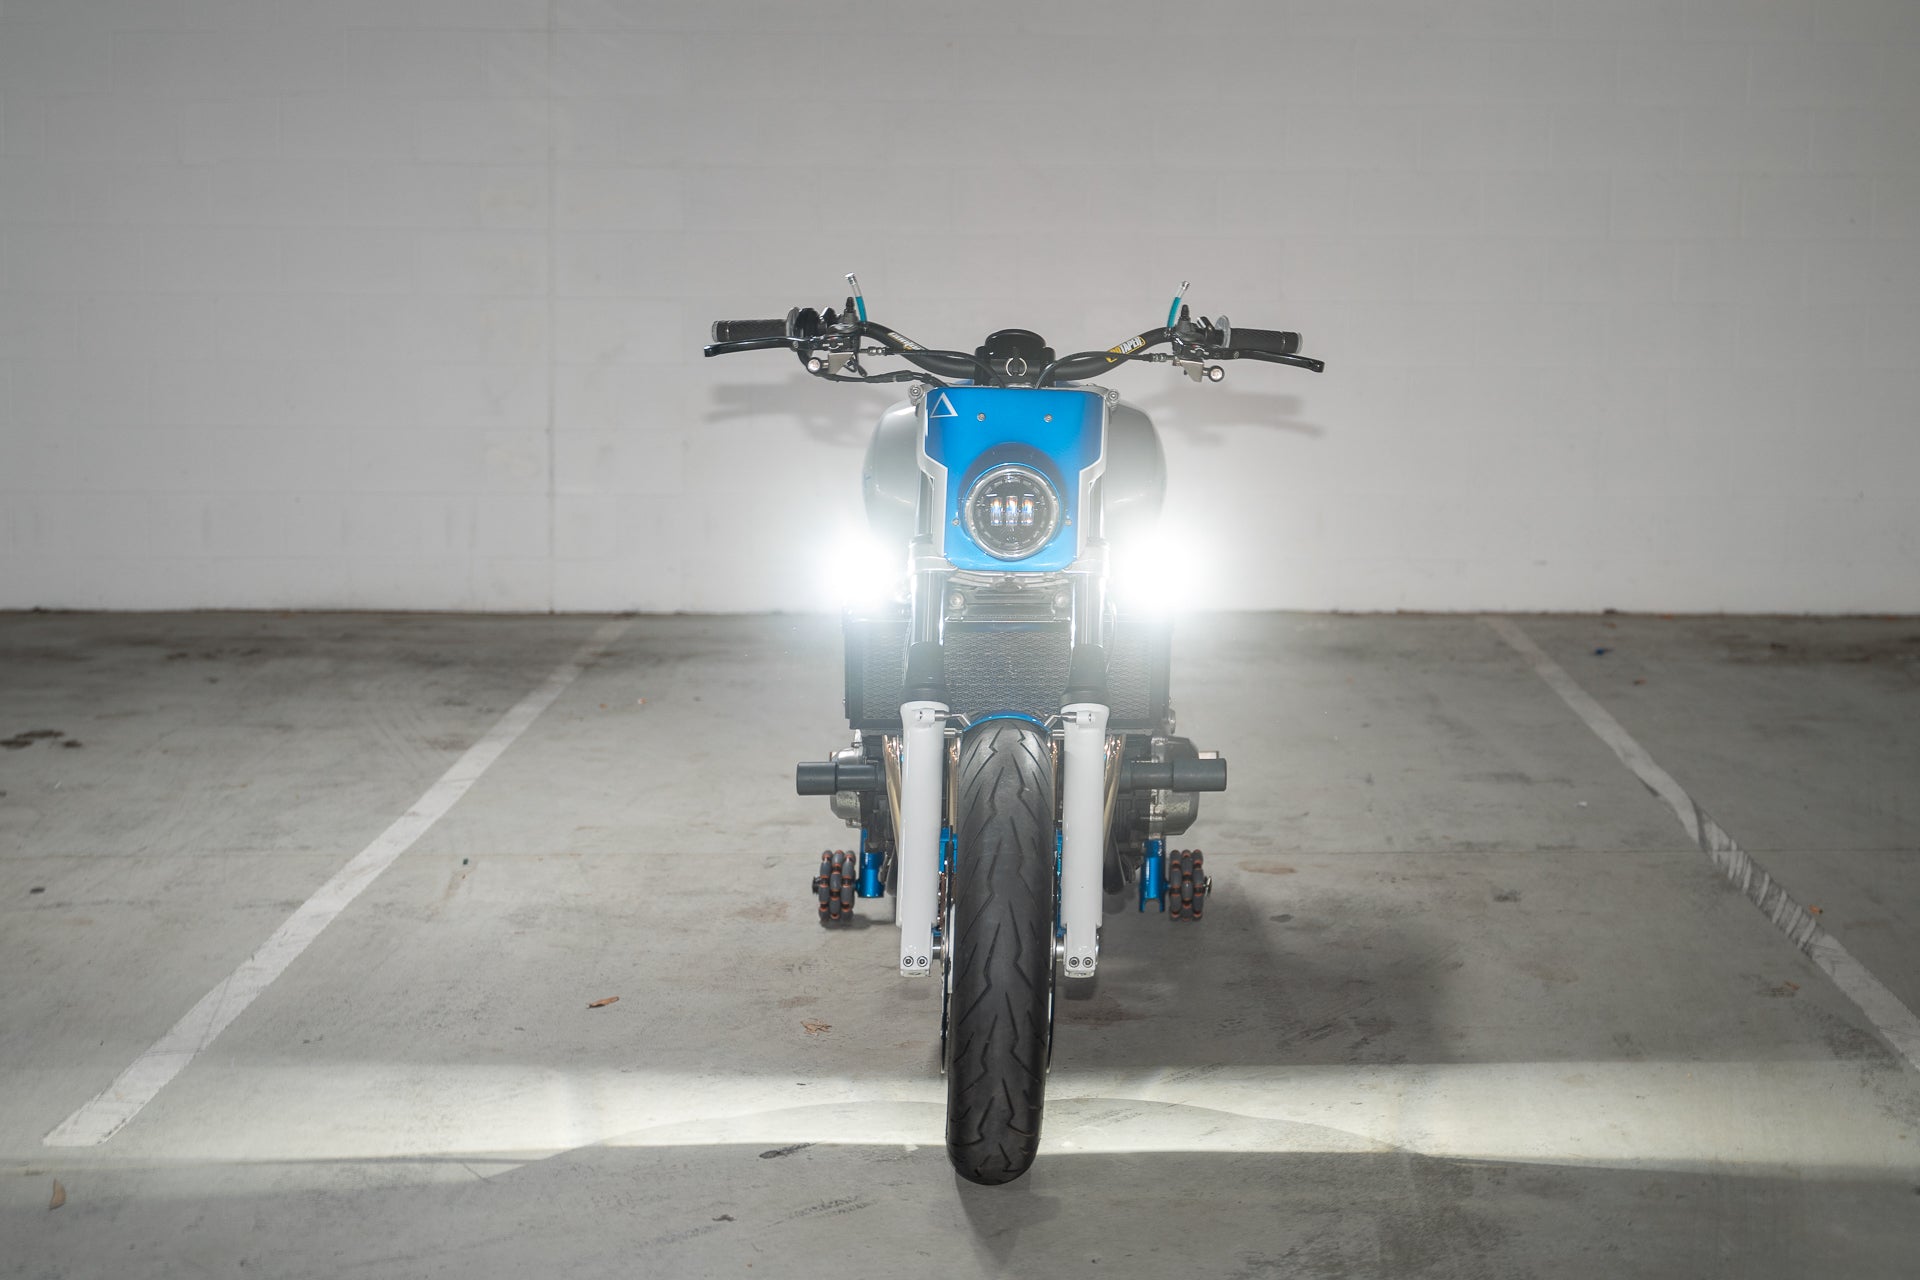
Often front lighting plates need to be offset from the forks to allow the gauge cluster to sit behind, to avoid this and have our lighting fit really tight to the forks we’ve made up a clean and super functional gauge mount off the bar clamps. We’ve run a Daytona W gauge here that houses both speedo and tacho in one 90mm gauge cluster, an epic piece of gear to minimise the accessories up front.
On the bars we’ve upgraded to Brembo levers, a set of PBM 3-button switches, some bar mounted indicators perched under the levers and a Domino Throttle assembly. All the lights are run though our PBM Black Box module to allow the push button switches to function with the factory ignition and EFI set up. Our final piece of fab work was the front fender. Nothing wild here, just some crispy and clean fabrication using our universal front fender kit.
The most exciting thing about this project for me was the paint colours and design. Early on in the project I was speaking to Luke and said we’ve got to run white wheels on this one. I don’t usually run Alloy or Mag wheels but if I’m going to, we might as well make a feature of them. The 3 spoke design is pretty nostalgic for me and speaks to 90’s and early 2000’s racers that I grew up watching. SO oddly enough the wheels being white set the tone for the rest of the bikes styling.

I went digging back through Suzuki’s archival moto GP photos and colour pallets and quickly realised Suzuki had done the same thing a few years ago. With the current Suzuki MotoGP colour palette being derived from the team’s colours used in the 60’s and 70’s. With the perfect colours found for this custom Suzuki GSX1400, I sent a few sketches away with the bike to Justin from Popbang Classics to have this epic paint job laid down!
Once the bike was assembled we all stood back in awe of this machine. It’s a really unique take on the GSX1400, a platform that you don’t really see customised very often and it’s turned out amazing. The only thing better than looking at the bike is riding it. The 1400 four is an absolute beast. Delivering handfuls of torque wherever you are in the rev range. Making the custom GSX ultimately fun to ride. With the sharper handling and livened up power delivery you just want to keep riding.
Thanks to a Dyno run and tune the mods we’ve done to the GSX have given the bike some significant mid range gains, putting out 107HP at the rear wheel and 130 Nm of torque. The power gains coupled with the handling and suspension improvements offset by the knowledge that the bike you’re riding is a one off machine with looks to kill makes the ride experience an ultimately memorable one.
We had another great experience working with Luke to turn out another blistering custom. He picked it up and rode the bike for 7 hours straight from our shop taking the long way home to his place on the NSW coast. I couldn’t think of a bloke more deserving of the custom Suzuki GSX1400.

WE BUILD BIKES WITH PURPOSE.
Purpose Built Moto is home for unique custom motorcycle builds. We offer a unique motorcycle customizing experience in the heart of the Gold Coast.


3 bình luận
The article provides insightful information about the design choices, technical modifications, and the builder’s passion. With high-quality photographs, it showcases the creativity and craftsmanship of the custom motorcycle community, leaving readers inspired and eager for their own personalized rides.
Hi Remy,
You can check out the headlight we use here:
https://purposebuiltmoto.com/product/flashpoint-classic-led-headlight-4-5/
We do not supply the aluminium plate, you can get this made in France though!
Sorry, I’m french and my English is not perfect ;)
But i am very interested in your headlight plate. I have a 2001 1400 GSX and am in the process of rebuilding it.
so, is it possible to buy you one, without paint ?
thank you for your answer and congratulations for your work. this 1400 is the most beautiful I’ve seen so far :D